Overview
Triumph’s Web Agility plugin adds significant features to
help improve your websites SEO capabilities. Best of all it leverages the power
of Rock to simplify administration. These tools include:
- Request Redirection – This allows you to establish rules that allow you to redirect traffic to new locations. This helps improve SEO by ensuring that your links don’t break. It also allows you to do some pretty cool tricks.
- Sitemap XML – Having a sitemap for your external website is another SEO best-practice. This is more difficult than you might think with a dynamic website. This module allows you to crawl your website and auto-generate the map file for you.
- Response Headers – The response headers module allows you to add response headers to requests from your website. This allows you fine grain control over caching strategies as well as a host of other use-cases.
- Request Headers – Finally, the request headers module allows you to add request headers to incoming requests to your website.
Each of these tools is discussed in detail below.
Redirector
The Redirector module allows you complete control over your
in-coming client requests, allowing you to redirect or transform the requests
with ease. You might be wondering why this would be necessary. While this
plugin is a great utility for many use-cases the primary reason you should be
interested in it is for search engine optimization (SEO).
When you move or change your website it’s important that you
don’t break all your previous links. Remember, these links live on inside of
search engines and more importantly as links from other websites. The
Redirector plugin allows you to catch requests for old links and redirect them
to their new home.
For instance, a link to blog post on your old site might
have been:
http://www.mysite.com/blogs/youth/{post-title}
You can not easily redirect that to its new location at:
https://www.mysite/youth/blog/{post-title}
Or, say you your website responds to both https://www.mysite.com and https://mysite.com, but you only want one of
those to be the primary (also known as canonical by the sophisticated crowd).
The redirector plugin can redirect all www. traffic to the other address (or
vise versa if you prefer).
That’s just scratching the surface though of what’s
possible. Keep reading to see all the options of this powerful plugin.
Configuration
Once installed you’ll find this module under ‘Admin Tools
> Installed Plugins > Web Agility > Redirector Rules’. Clicking on the
link will take you to a list of configured redirection rules.
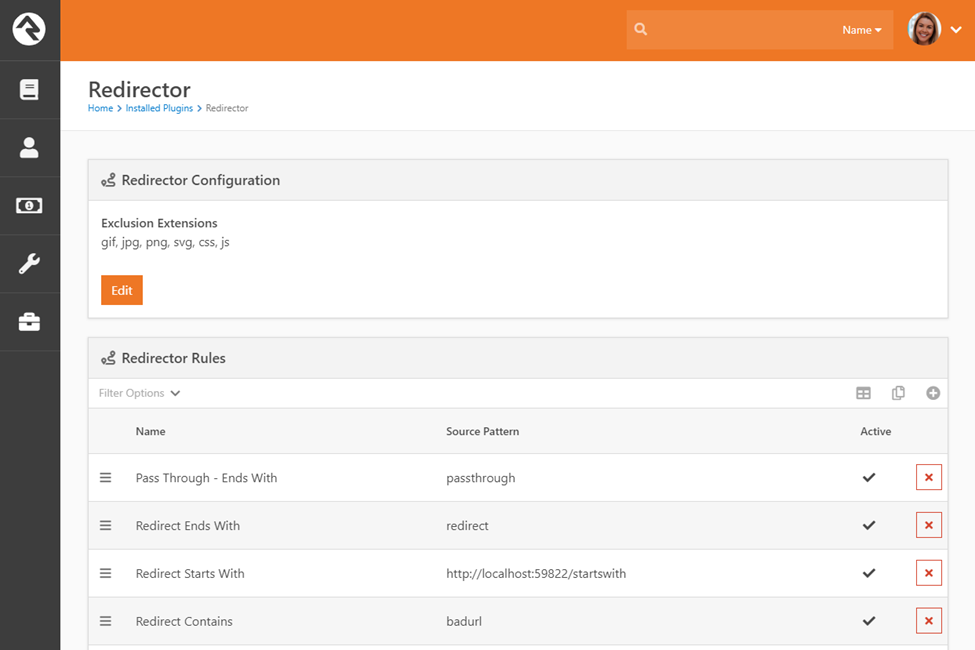
In general, it’s better to have as few rules as possible as
each will need to be considered for every request coming into your server. That
said, we have worked hard to make this plugin very performant (fast).
To improve speed, you can provide file extensions to ignore.
For instance, you generally won’t need to add redirection for images, CSS or JavaScript
files.
Technical Details
For those interested here are some additional details of
what’s going on under the hood:
- The Redirector plugin works as an HTTP Module inside of IIS. This means that it will get the HTTP request before Rock even knows about it. This allows you to modify the actual URL before it gets to Rock.
- Because Redirector works outside of Rock it can’t read its settings from the database directly. Instead, the settings are stored in a JSON file under the ‘App_Data’ directory (~/App_Data/RedirectorRules.json).
- While the rules are stored in the file, they are also cached in memory for speed. Updating a rule or configuration value will flush this cache.
Redirection Rules
Let’s jump to the juicy part, the rules. Rules are broken
down into two parts:
- Match Criteria – What to look for in a web request to enable a specific rule.
- Action – What action to perform if a match is found.
Let’s break each of these steps down and look at the
configuration options available for each.
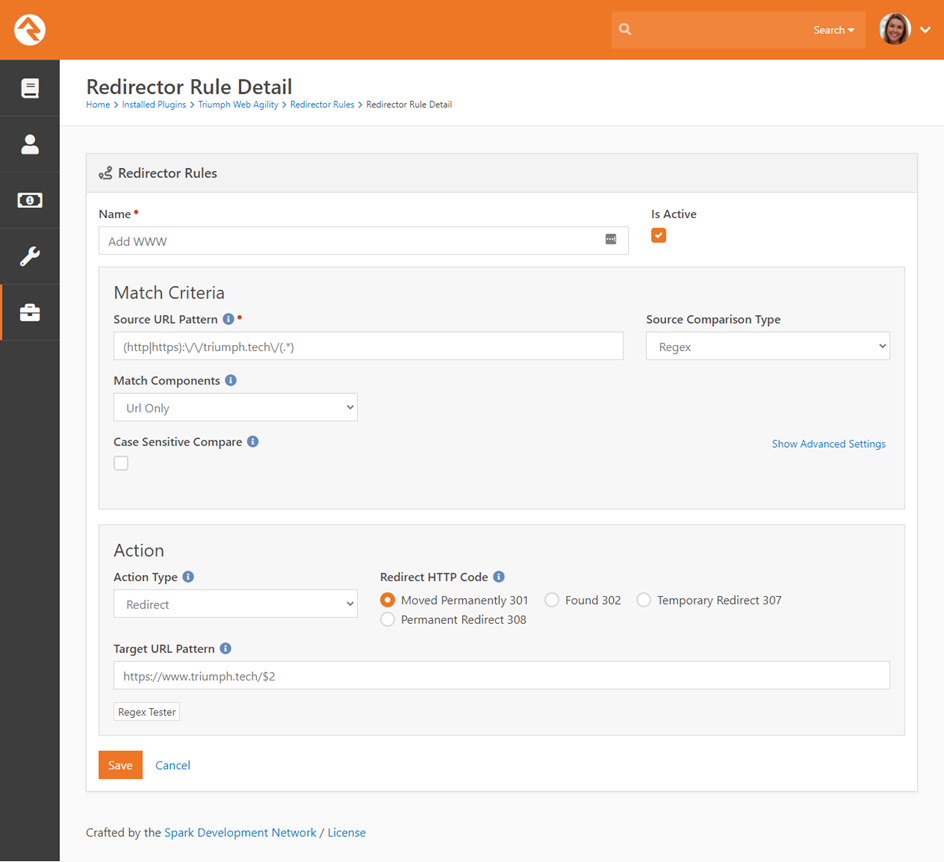
Match Criteria
The first step in the redirect process is to determine if
the incoming request should be matched to a specific rule. If it is a match,
then the action will be performed. The match logic is very customizable. Let’s
look at what’s possible.
Source URL Pattern
The primary match logic will be “what are we looking for in
the incoming URL”. We provide that string here. Note that we are matching
against the entire URL (e.g. https://www.mysite.com/GroupViewer.aspx?Group=12).
Source Comparison Type
Next, we decide how to match the pattern to the URL. The
options are:
- Starts With – The URL must start with the string we provided.
- Ends With – The URL must end with the string we provided.
- Contains – The URL must contain the string we provided.
- Regex – A regular expression will be used to determine the match. This option also allows you to pull chunks of the URL for use in the action. This option is so powerful we’ve included a whole section of the manual to it below.
Match Components
We know what we’re looking for in the URL. Now, we can
provide some advanced criteria. The options include:
- URL Only – This is the default. In this case the match will only consider the URL.
- URL and Login Status – In this case we’ll match the URL and the login status (‘Is Logged In’ or ‘Is Not Logged In’) of the individual. This is super powerful as we can redirect to different pages based on the fact if we know who the individual is.
- URL and Referred – This allows you to further filter by the value in the “Referrer” (intentionally misspelled https://en.wikipedia.org/wiki/HTTP_referer) HTTP Header. This value is the address of the page that linked to the document. With this setting you can redirect based on where the page was linked from. The value you provided will be matched if the referrer contains the value.
- URL and User Agent – This setting allows you to further filter by the browser the person is using. This is helpful for dealing with situations where a person may be using a very old browser that your site does not support. In this case you could redirect them to a page that notifies them that your site does not support the ancient browser.
Case Sensitive Compare
This option allows you to determine if the match should be
case sensitive. Sometimes that might be just what the doctor ordered, other
times (most of the time in fact) it won’t be needed. Either way, you’re
covered.
Advanced Settings
You may have noticed the toggle to show and hide advanced
settings. These settings allow you to take your rules to the next level.
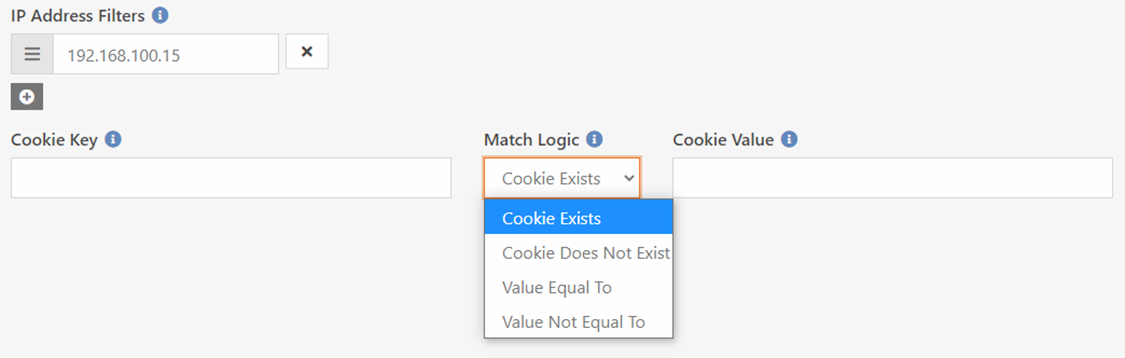
IP Address Filters
You can limit your rules to clients at specific IP address. Perhaps you’d like
to have some special rules for individuals on your campuses or other known
networks. You can provide several IP filters for each rule. These filters
accept several different formats. Let’s look at the most common:
- Single IP Address – 192.168.100.12
- IP Address Range – 192.168.100.1 – 192.168.100-255
- Shortcut Range – 192.168.100.23-45
- Subnet Mask – 192.168.100.1/255.255.255.0
- CIDR Expression – 192.168.100.1/24
- IPv6 - fe80::/10
Cookies
Sometimes you may want to filter the rule by the existence (or absence) of
a cookie. This allows your code (Lava or C#) to help opt people into our out of
rules.
Actions
Now that we have the match criteria figured out, let’s see
what’s possible when rules are processed. The first thing we’ll want to
determine is if we should redirect, pass through the request or error out.
Let’s consider each.
Redirect
This will be the most common option. Based on the provided
URL we’ll redirect to the new URL. There’s several type of redirect to choose
from.
- Moved Permanently 301 – This is the default. It tells the browser (or Google search crawler) that the page has moved and provides the new location. This is the SEO friendly option.
- Found 302 – The 302 redirect tells the requestor that this redirect is temporary. Should only be used for GET methods (most requests are GETs)
- Temporary Redirect 307 – This is a bit confusing as it seems very similar to the 302. That’s because this redirect should only be used for POST requests.
- Permanent Redirect 308 – Similar to the 301 but allows the HTTP method the change.
Warning
When working with redirects it’s important to note that Chrome caches a 301 redirect. This can make testing rules a bit of a challenge and lead to some unexpected results. See this blog post for information in how to clear Chrome’s redirect cache (https://salferrarello.com/chrome-clear-redirect-cache/).
Passthrough
This option doesn’t initiate a redirect at all. Instead it
modifies the incoming URL and continues the processing of the request. As far
as Rock knows the original request’s URL never existed. It only sees the new,
modified URL.
Error
This option allows you to provide an HTTP error if the rule
is matched. Keep in mind this error is processed before it gets to Rock so the
normal Rock 404 logic will not be run.
Target URL Pattern
If your action is a Redirect or Passthrough you’ll need to
provide the target URL pattern. This will be the new URL you want the
individual to go to. Note if you used a regular expression match above you can
dynamically create this address with pieces from the original. This is covered
in the “Regular Expressions in Rules” section below.
Regular Expressions in Rules
Redirection rules become super powerful when you add regular
expressions to the mix. Don’t worry this doesn’t need to get complex. We’ll
provide enough examples to help you get maximum power with minimal effort.
Regular Expression Syntax
Books have been written on regular expression syntax and
many people have gone bald pulling their hair out over it. Don’t worry though,
we’re going to give you a cheat sheet of the most common use cases.
First a few basics:
. means any character* means any number of the previous character- So,
.* means any number of any character - It’s important to note that the character /, commonly used in URLs must be escaped (proceed by) a \ character.
Use Case: Match URLs ending with groups OR smallgroups
Say you wanted to match either of the URLS below:
- http://www.mysite.com/smallgroups
- http://www.mysite.com/groups
This expression would do the trick:
.*\/(groups|smallgroups)$
The logic is:
- Start with anything
(.*) - Then contains a
/ \/() - Then contains ‘groups’ or ‘smallgroups’
( (groups|smallgroups) ) - And the
$ says this must be at the end
Use Case: Matching an optional trailing slash
Say you want to match either of the following URLs:
- http://www.mysite.com/blog
- http://www.mysite.com/blog/
The expression below would match either:
.*\/blog[\/]?$
The logic is:
- Start with anything
(.*) - Then has
/blog - And could have an optional end slash
([\/]) - And the
$ says this must be at the end
Use Case: Matching all blog posts with non-SSL
Assume you wanted to forward all traffic to your old blog
that was not encrypted to a new page on your website. You could use the
following expression:
http:\/\/.*\/blog\/.*
The logic is:
- Starts with http://
(http:\/\/) - Then has any number of characters
(.*) - Then has /blog/
(\/blog\/) - Then has any number of characters to the end
(.*)
While regular expressions are helpful in match conditions,
in most cases the starts with, ends with and contains will get what you need.
Where the expressions really shine though is when you want to extract pieces of
the source URL to use in the new target URL. For example, if you were moving
your blog site from:
https://www.mysite.com/blogs/youth/parenting-tips-for-grade-school
to:
https://www.mysite.com/youth/blog/parenting-tips-for-grade-school
You’d want to grab the post name to use in the new address.
To do this we will create capture groups. These groups are defined in your
regular expression statement by using parentheses. For example, to capture the
blog post name we would use the following statement.
.*\/blogs\/youth\/(.*)
This would match the first URL above and ‘capture’ the blog
post title to be used in the redirect as the variable $1. The target pattern
URL would then be:
https://www.mysite.com/youth/blog/$1
This allows any blog post title from the source URL to be
appended in the target of the redirection.
You’re not limited to just one capture group, you can in
fact have as many as your want. Say for some reason you wanted your rule to
work with either http or https and respect the protocol through the redirect
(not a best practice in today’s https only world, but say you did). You could
use the following patterns:
Source URL Pattern
(http|https).*\/blogs\/youth\/(.*)
Target Pattern
$1://www.mysite.com/youth/blog/$2
Remove www. from URLS
Let’s say that you want to remove www. from all the URLs to
your site. It’s a good practice to have your website only respond to one (https://developer.mozilla.org/en-US/docs/Web/HTTP/Basics_of_HTTP/Choosing_between_www_and_non-www_URLs).
Source URL Pattern
(http|https):\/\/www\.mysite\.com(.*)
Target Pattern
https://mysite.com$2
Note how in this pattern we basically throw-away the first
capture group as we want to always use https.
Sitemap XML
Sitemaps are an essential tool that allows search engines to
better index your website. They’re basically a list of every page on your site
(think of them as a cheat sheet for search engines). This might sound like a
simple file to create right… but… in the age of dynamic websites it’s actually
quite difficult. You see, one page in Rock can represent hundreds or thousands
of pages to a visitor. For example, the Message Series page is one page in
Rock, but it dynamically loads the series name and art for every series you’ve
ever done.
The Web Agility plugin provides a job that allows you to
crawl your site to generate a sitemap.xml file for a selected Rock site. Below
is a screenshot of the job settings.
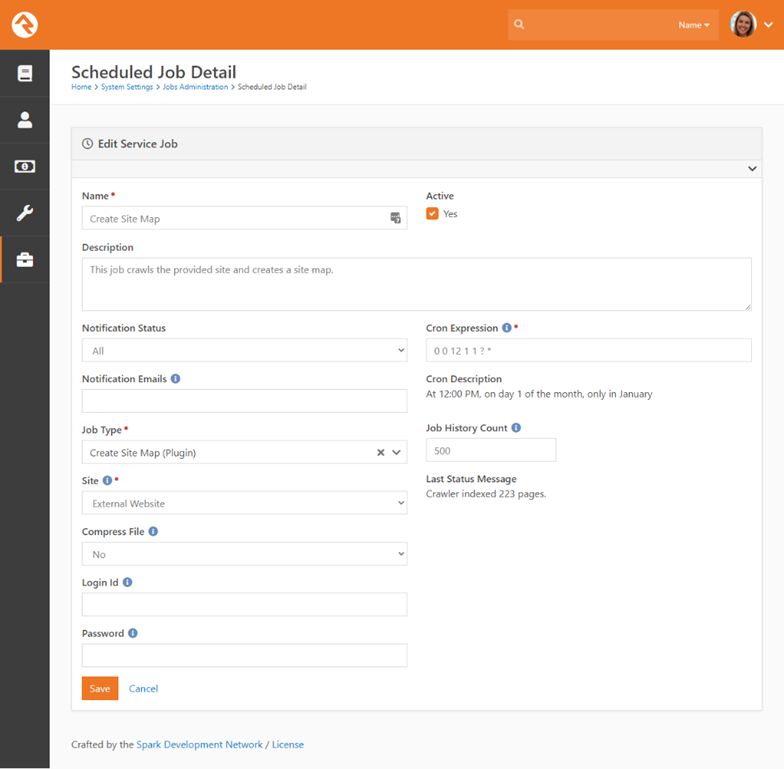
Settings
Below is a listed for each setting for this job.
- Site – The website you’d like to create the sitemap for.
- Compress File – Determines if you want the job to compress the sitemap for you using gzip. This is a best practice to do this with larger sitemaps.
- Login Id & Password – These settings allow you to provide a username and password for the crawler to use as it finds the pages on your site. Typically, you won’t use these settings as search engines won’t be able to get to the pages it finds, but it’s there if you need it.
Results
Once the job runs, you’ll find the sitemap under
“~/Content/Sitemaps/site-3-sitemap.xml”. Note the ‘3’ is the site id for the
site you selected in the job. If you chose to compress the file it will have an
additional ‘.gz’ after the ‘.xml’.
You can now submit the URL to this file to the search
engines of your choice. See this article for more details:
https://yoast.com/help/submit-sitemap-search-engines/
Configuration Tips
Here are some tips for setting up indexing on your site.
- Site - Enable each site that you would like to add to the index under
Admin Tools > CMS Configuration > Sites. Edit the site's Advanced Settings to allow indexing.
- Individual Pages - You can also configure individual pages for crawling under
Admin Tools > CMS Configuration > Pages > Page Settings > Advanced Settings - Content Channels - If any of your pages involve dynamic content, the relevant Content Channels need to be enabled for indexing. You can verify this by navigating to
Admin Tools > CMS Configuration > Content Channels within the Internal Site and checking the Channel details.
Sitemaps and Robot.txt Files
Another way to share your sitemap file is to include it into
your robot.txt file in your web server’s root folder. The problem is a web
server can only have one of these files and a file can only represent one
website (remember Rock can host server sites / micro-sites for you). Never
fear, we’ve created a way to have your cake and eat it too… dynamic robot.txt
files!
Dynamic robot files are created on demand. Here’s how it
works:
1. Enable Dynamic Robot Files in the Redirector plugin.
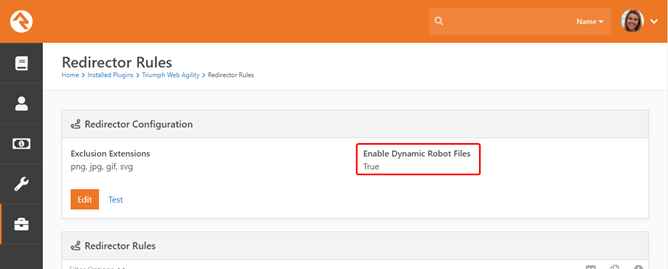
2. This
will redirect all requests for /robot.txt to a custom REST API behind the
scenes.
3. This
REST API will look at the URL and match it to a site in Rock. It will then
create a robot.txt file for that site by looking for a
‘site-3-sitemap.xml(.gz)’ file in the ‘~/Contents/’ folder.
Some of the more astute webmasters out there might be
thinking, “But there’s more to a robot.txt file than just the sitemap, what
about all of the other rules I might want to add to the file?” Well, we thought
of that too… When the plugin was installed, we also added a ‘Robot Rule’
attribute to the site in Rock. Anything you add to the attribute will also be
put into your dynamic robot.txt.
Tip
There’s a few other tricks for sitemaps in the Response Header section below…
The Response Header Module allows you to add headers to your
HTTP response objects that are sent back to your visitor’s web browsers. This
might not sound very interesting, but it actually has useful applications.
Response headers are what helps drive caching on the web. While Rock allows you
to adjust these headers in many places there are a few areas that Rock can’t
provide the headers for. This module allows you to write powerful rules to add
these cache headers. This is super helpful when you add a Content Delivery
Network (CDN) to your website.
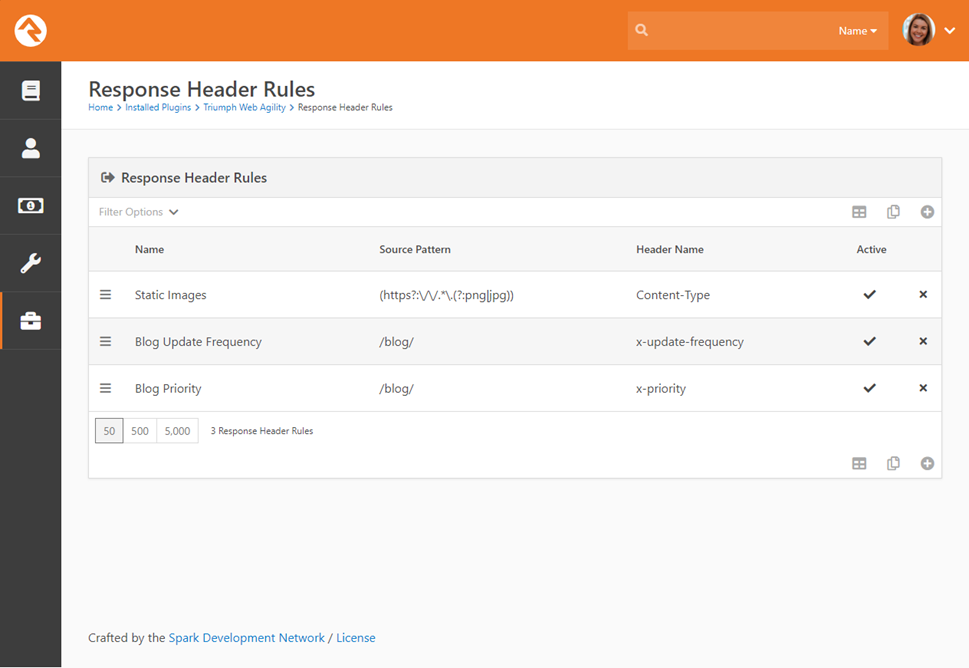
Configuration
Once installed you’ll find this module under ‘Admin Tools
> Installed Plugins > Web Agility > Response Header Rules’. Clicking
on the link will take you to a list of configured rules.
Clicking on a rule will take you to the specific rule
detail.
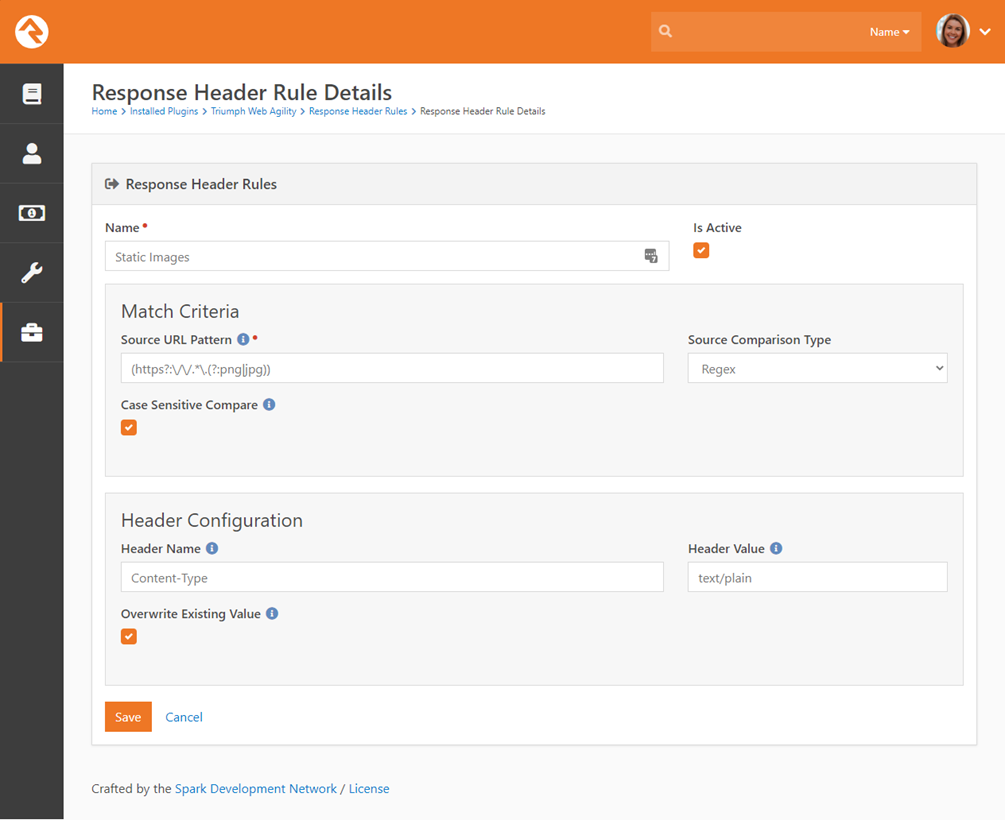
Let’s analyze the settings for a header rule.
- Name – The friendly name for the rule.
- Is Active – Pretty obvious what this does right?
- Match Criteria
- Source URL Pattern – This is the matching pattern to evaluate the URL to determine if the header should be added.
- Source Comparison Type – This determines how the match should be evaluated. Options here include:
- Starts With
- Ends With
- Contains
- Regex
- Case Sensitive Compare – Determines if the match should consider the case of the URL.
- Header Configuration
- Header Name – The name of the header.
- Header Value – The value of the header.
- Overwrite Existing Value – Often times the header might already exist by the time it gets to the module. This allows you to determine if you’d like to replace the value if it does exist.
Examples
One common example use case might be to add a cache header
to requests for static images on your webserver. The regex pattern for that
would be:
(https?:\/\/.*\.(?:png|jpg|gif|svg))
You’d then want to add the header “Cache-Control” with the
value of something like “public max-age=3600”.
Bonus tip to make your sitemaps even more powerful… Sitemaps
allow you to add additional information about a page. This includes a hint
about how often a page is updated and how important that page is to your site.
We’ve added the ability to add these properties to your sitemap by adding
headers to the pages. Below are details about these Rock specific headers:
- x-update-frequency – The valid values for this header include:
- Always
- Hourly
- Daily
- Weekly
- Monthly
- Yearly
- Never
- x-priority – This can be a decimal number between 0.0 and 1.0 with 1 being very important (default is 0.5).
The Request Header Module allows you to add headers to
incoming HTTP requests. This module
works almost identically to the Response Header Module described in the
previous section, with the same kind of rules and configuration options, so we
will only briefly describe it here.
Configuration
Once installed you’ll find this module under ‘Admin Tools
> Installed Plugins > Web Agility > Request Header Rules’. Clicking on
the link will take you to a list of configured rules. From here, you will find
the rule configuration is identical to the rules described in the previous
section. The only difference is that
these headers are added to incoming HTTP requests, instead of your outgoing
HTTP responses.