Overview
Rock supports plugins to allow communication with various
phone systems. This specific plugin allows Rock to exchange information with a
Switchvox phone system as well as to enable click-to-call functionality.
Setting Up SWITCHVOX
Before configurating the integration you’ll want to ensure
your Switchvox environment is configured correctly.
Ensure Connectivity
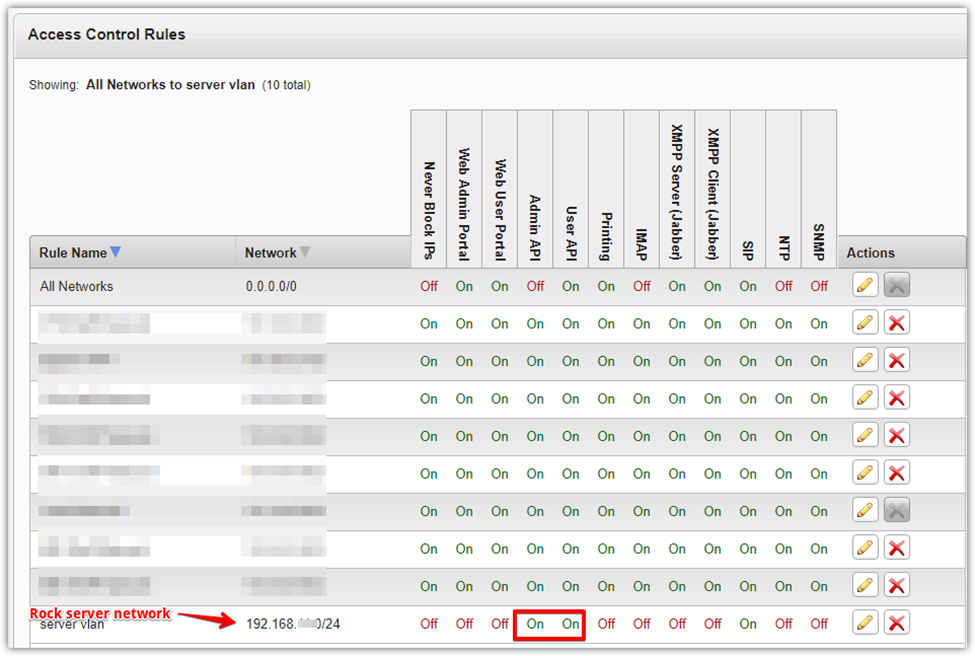
The first step is to ensure that there is connectivity
between your Switchvox server and your Rock server. If they’re on the same
network, great! If not, you may need to configure Access Control Rules inside
of Switchvox. The specifics of this step are outside the scope of this
document. See your network administrator for assistance if needed.
You’ll also need to create/configure a Switchvox user for
the integration to use. You may choose to use the default administrator
account. If you’d prefer to use a new account you’ll need to ensure that it has
proper rights to run. The screenshot below shows the minimum rights this user
should have.

Note
The precise settings may change based on Switchvox
version. Please see the Switchvox references for more information.
Configuring the Plugin
Once the plugin is installed, click to ‘Admin Tools >
System Settings > Phone Systems’. You should see the Switchvox plugin in the
list. Before clicking to edit the settings, you will first want to adjust the
security of the plugin. The ‘View’ action determines who will be able to view
click to call links and be allowed to place calls. By default, we have enabled
this for the ‘RSR – Staff Worker’ role. You may want to adjust this security
though.
With security set, you can now proceed to the details of the
Switchvox settings.
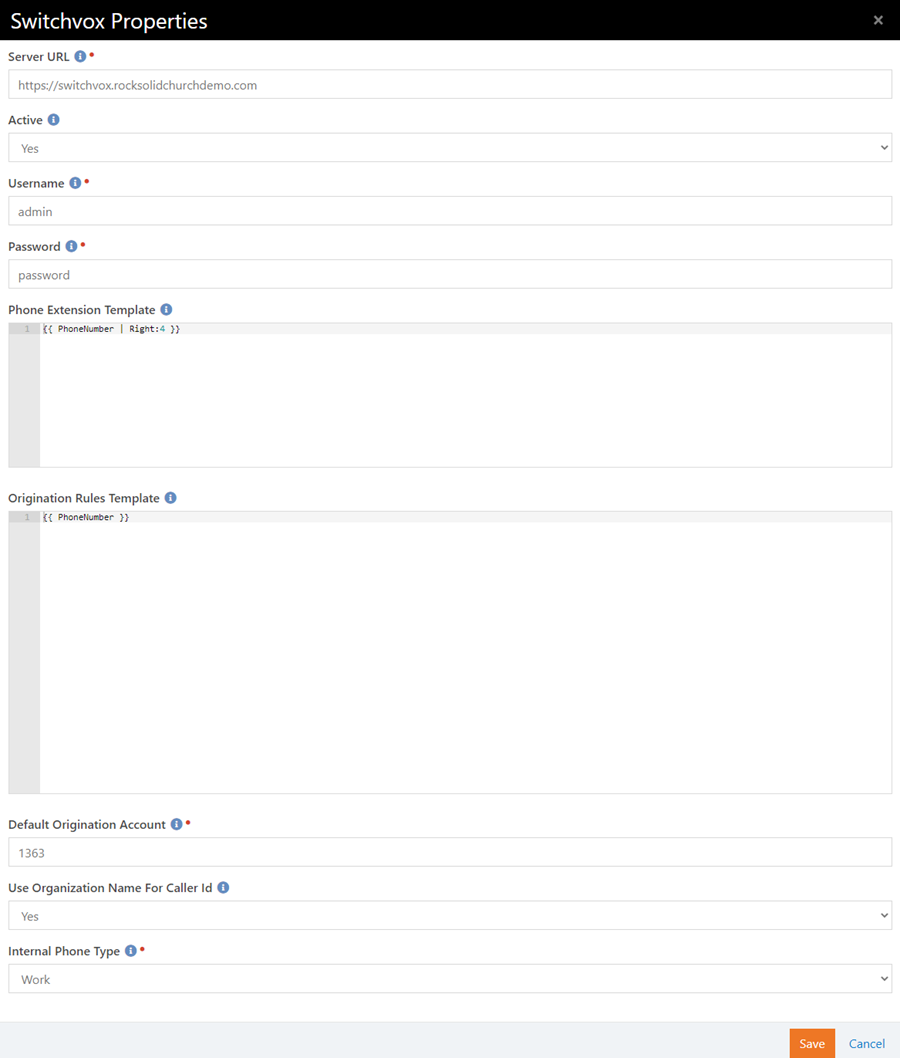
- Be sure to activate the provider so that it will be available in Rock.
- Provide the base URL to your Switchvox server (e.g. https://switchbox.rocksolidchurchdemo.com)
- Provide the Switchvox username and password to use for making API calls.
- Next up you have the ability to set origination rules. These rules help reformat the phone number before sending it to Switchvox to dial. For instance, you may need to:
- Convert the full office phone number (e.g. (602) 555-5534) to just the extension (5534).
- Add a 1 to the number for long-distance calls.
- Strip off an area code for local calls.
This field allows you to write your rules in Lava. An
example is below of a rule that will convert a full office number to just the
extension. This is a common pattern you’ll want to follow.
{% assign phonePrefix = PhoneNumber | Slice: 0, 6 -%}

{% if phonePrefix == '319297' -%}
    {% assign extension = PhoneNumber | Right:4 | AsInteger -%}
    {% if extension > 2339 and extension < 2481 -%}
        {{ extension }}
    {% else -%}
        {{ PhoneNumber }}
    {% endif -%}
{% else -%}
    {{ PhoneNumber }}
{% endif -%}
5. The
Phone Extension Template allows you to get the internal extension from a full
phone number. Say, for instance, your organization has direct dial-in numbers
in the format of (602) 555-3454, where the last four digits are the internal
extension. This template will define that logic. This allows you to have your
internal phone numbers in a single format.
6. The
Use Organization Name for Caller Id helps to determine what text to use for the
caller id when using click-to-call. By default, the name of the organization
will be used. If you disable this setting, however, the name of the caller will
be used. While this may seem to be the most logical approach, it is often
confusing for the person who clicked the click-to-call link to now get a call
with their name showing up on the caller id.
7. When
initiating a click-to-call Switchvox requires you to pass-in the extension that
is authorizing the call. In most cases we’ll know the logged in person who and
can use their extension to lookup up the Switchvox account. But in some rare
cases, this might not always be the case. Say for instance you make a REST API
call to originate a call between two external numbers. In this case we’ll use
the account id of the default extension configured here as the authorizing
extension. This value must be the
‘Account Id’ of the extension. You can find the account id for an extension
under ‘Admin Tools > General Settings > Defined Types > Switchvox
Extensions’. You’ll need to run the sync once for this defined type to be
populated. Initially, you can set this value to a random number (e.g. ‘1234’)
and the come back and update it to a real value. Don’t forget to comeback
though or your click-to-call will not work.
8. Finally,
the Internal Phone Type determines which of the Rock phone types should be used
as the internal number.
Additional Settings
Sync Job
When the plugin is installed, a job will be added to sync
the call detail records and extension list. If you would want to adjust any of
the settings you can under ‘Admin Tools > System Settings > Jobs
Administration > Switchvox Sync Job’. The first time this job is run it
could take a while to run, as it will attempt to download all previous CDR
records in your phone system.
Extension List
Once you have the Switchvox integration running it will
automatically create and sync a list of extensions for you. These are stored as
a Defined Type called ‘Switchvox Extensions’. For the most part you don’t need
to worry about this list, it is automated to keep things current. It is helpful
to know that it exists, as you may run into a case where the extension you are
expecting to be tied to user A is actually tied to a different person. When
this happens it’s probably caused by both people in Rock having the same
extension on their record. This list gives you a good sanity check to see
what’s happening.
Personal Preferences
Each person with access to use the click-to-call features
can determine which number they would like to use to initial the call. By
default, their internal extension will be used, but they can change that to use
their mobile or home phone if they wish. This can be set under ‘My Settings’
from the login status drop-down in the upper-right part of any internal page.