Note
For those upgrading from the 1.0 version of this
plugin, please be sure to read carefully the updating guide as there are some
changes you’ll need to make to adjust your templates.
Usage
Who doesn’t love PDF, right? Native web pages are great, but
at the end of the day sometimes you need PDF for those items that require the
ability to download and be saved. Unfortunately, creating dynamic PDFs on the
fly has been tricky, until now. Due to the fact that quality HTML -> PDF
components are not open-source, this functionality is provided as a plugin.
In fact, this plugin doesn’t give you one tool to create
PDFs, it provides you three, that’s right… three.
- Lava To PDF Block – Place this block on a page and you can create PDFs from a simple Lava Template.
- PDF Merge Document – Rock Core supports both Word and HTML merge docs, now you can add PDF to that list!
- Lava To PDF Workflow Action – This workflow action takes a Lava template and creates a PDF document that is stored as an attribute.
Lava To PDF Block
To create a PDF, simply create a new page and add the ‘Lava
To PDF’ block on the page. Provide a Lava template that creates a formatted
HTML file, and you’ll get a PDF. It’s that simple. But wait there’s features,
tons and tons of features…
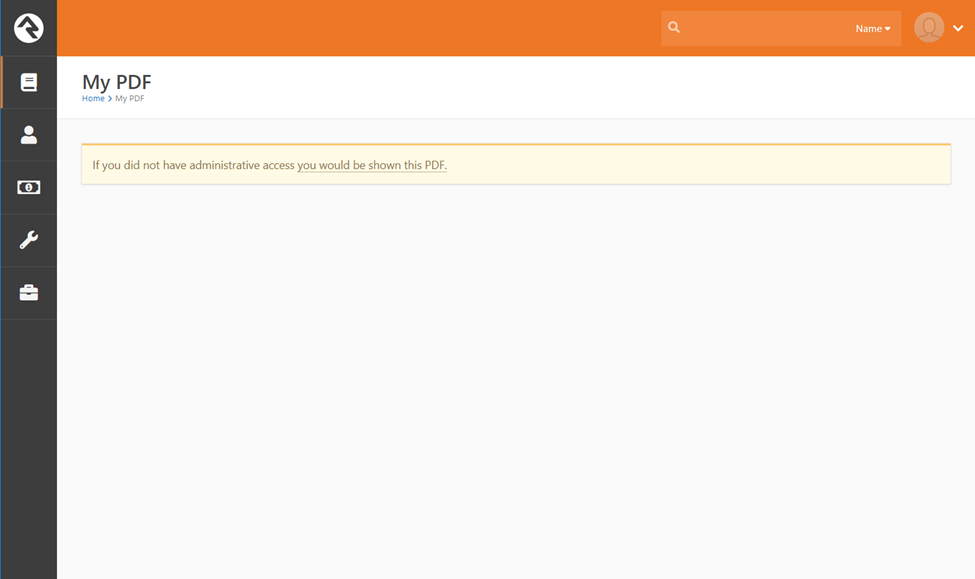
Before we dive into the features, let’s look at one detail
that helps you, as an administrator, format your PDF. If you have
Administrative access to the ‘Lava 2 PDF’ block, you won’t get the PDF
directly. Instead, you’ll be shown a link to the PDF. If we didn’t provide this
functionality, you would essentially be locked out of editing your PDF since
you wouldn’t be able to view the block settings. Be sure to also use the
‘Enable Debug’ block setting to help provide a listing of the merge fields
available for your use.
Block Settings
Below is a listing of the block settings provided for
creating documents.
- Enabled Lava Commands [Default: None]
- Since we don’t know what data you’ll need for your PDF, you’ll need to use the Lava commands to retrieve the data directly. This block wouldn’t be all that useful without these commands. Think about this for a bit to grasp the power you have. You can print beautiful documents by pulling data from Rock using SQL or Rock Entities, you can call C# to get your data, or you can make REST calls to get data out of third party systems. That last option should have your head spinning. Think of pulling data from PCO and providing it to your attendees on the website, personalized just for them!
- Document Width [Default: 8.5]
- We won’t insult your intelligence by describing this one. Just know it’s in inches and accepts decimals.
- Document Height [Default: 11]
- You got this…
- Document Name [Default: document.pdf]
- This will be the name of the file when the person downloads it. It accepts Lava, too, so there’s no reason to use ‘contribution-report.pdf’ when you could use ‘contributions-ted-decker-2017.pdf’.
- Document Template [Default: <sample>]
- This is the HTML/Lava template for creating your document. Be sure to read through the tips below in creating your HTML and CSS.
- Open Inline [Default: True]
- This determines how the file is opened in the browser. When the page loads with the PDF inline, the PDF file will be displayed in the browser. When the link is clicked with inline disabled, the PDF file will be downloaded, and the page containing the link will remain in the browser. This is a really cool effect as you never see the page that hosts the ‘Lava To PDF’ block.
- Document Render Delay [Default: 0]
- This sets a delay (in seconds, no decimals) to wait before rendering the PDF. This is helpful if you need to wait while external fonts are download to scripts run (think loading Google maps).
- Auto Create Bookmarks [Default: False]
- This will create PDF bookmarks from the h1-h6 tags in your HTML.
- Enable Debug [Default: False]
- Like many of Rock’s blocks there is a debug mode that will display the merge fields available to you. You get access to things like: Global Attributes, Page Parameters, Current Person, and Campuses. You’ll also get a view of the Document in an iFrame (minus the header and footer).
- Header / Footer [Default: Disabled]
- Next you have some settings that deal with the header and footer. The settings are the same for both, so we’ll describe them together:
- Enable – Whether they should be displayed
- Template – The HTML template for each. Not that these are full HTML docs. They do not have access to the styles and resources of the Document Template. They do have access to Lava though.
- Height – This is the height (in inches) for the header and footer.
- Spacing – This is the height (in inches) of the gap between the header/footer and the document content.
- Background Color – You could, of course, style this in your template, but we provided a setting to make it just a little easier.
Tips and Tricks
Below are some tips and tricks to help you make GREAT
looking documents.
- While there is a setting to disable, repeating the table headers when a table crosses a page you can also disable this in your CSS on a table by table basis by adding style="display: table-row-group" to thead and tfoot tags.
- You can force page breaks in PDF using the page-break-before:always and page-break-after:always CSS attributes in HTML elements styles. The page-break-before:always attribute will force a page break right before the position in PDF page where the element would be normally rendered and the page-break-after:always will force a page break right after the position in PDF page where the element would be normally rendered.
- When setting up margins for your document in CSS, don’t forget you can use inches as units like: margin: 1in;
- If there are large divs or other elements you’d rather not split across a page break, use ‘page-break-inside: avoid;’ as a style element. If the render can avoid it, it will try not to break up the element.
- Internal links within the document will be kept in the PDF.
PDF Merge Documents
For the most part, the PDF Merge documents work very similar
to their HTML cousins. But instead of returning an HTML document, the HTML
template is rendered as a PDF. Most of the settings from the Lava To PDF block
above are supported in the merge document. Since there are no block settings to
drive these parameters, you’ll instead add them as parameters in the HTML tag
of your template. Below is a short example showing the use of a couple of the
settings (in green). A full list of the settings can be found below that.
<html
	document-width="11"
	document-height="8.5"
	document-name="mydocument.pdf"
	autogenerate-bookmarks="true"
	table-header-repeat-enabled="true"
	avoid-image-breaks="true"
	document-background-color="#c4c4c4;"
	image-scaling-enabled="false"
	reset-page-numbers-per-row="true" >
	<body>

		<header height="2" spacing=".1" background-color="#c80505">
			This is the header. Current Person = {{ CurrentPerson.FullName }}
		</header>

		{{ CurrentPerson.Full Name }}

		{% for row in Rows %}
			<pre>{{ row.FullName }}</pre>
		{% endfor %}

		<footer height=".5" spacing="2" >
			This is the footer. Current Person = {{ CurrentPerson.FullName }}
			<br>
			[page] of [topage];
		</footer>
	</body>
</html>
| Setting | Default | Note |
|---|
| document-width | 8.5 | We won’t insult your intelligence by describing this one. Just know it’s in inches and accepts decimals. |
| document-height | 11 | You got this… |
| page-margin-top | 1 | The top margin of the page. |
| page-margin-bottom | 1 | Umm… yeah the bottom margin of the page. |
| document-name | document.pdf | This will be the name of the file when the person downloads it. It accepts Lava, too, so there’s no reason to use ‘contribution-report.pdf’ when you could use ‘contributions-ted-decker-2017.pdf’. |
| render-delay | 0 | This sets a delay (in seconds, no decimals) to wait before rendering the PDF. This is helpful if you need to wait while external fonts are download to scripts run (think loading Google maps). |
| autogenerate-bookmarks | false | This will create PDF bookmarks from the h1-h6 tags in your HTML. |
You can add page headers and
footers. To do this add <header> and <footer> tags to your document
(as shown in blue in the example). These will be treated as page headers and
footers (meaning they will show on each page).
The header and footers also
have settings.
| Setting | Note |
|---|
| height | This is the height (in inches) for the header and footer. |
| spacing | This is the height (in inches) of the gap between the header/footer and the document content. |
What About Lava Commands?
Since all staff users can
upload their own Merge Documents, there isn’t a secure way of controlling
access to the specific Lava Commands for a single merge document. Like it’s
HTML Merge Template cousin in Core, the templates rely on the Global Attribute
‘Default Enabled Lava Commands’ to get the enabled Lava commands.
Lava to PDF Workflow Action
In its simplest form, this workflow action takes a Lava HTML
template and converts it into a PDF file, which is inserted into the workflow
attribute you select. This result attribute must be of type File to be used.
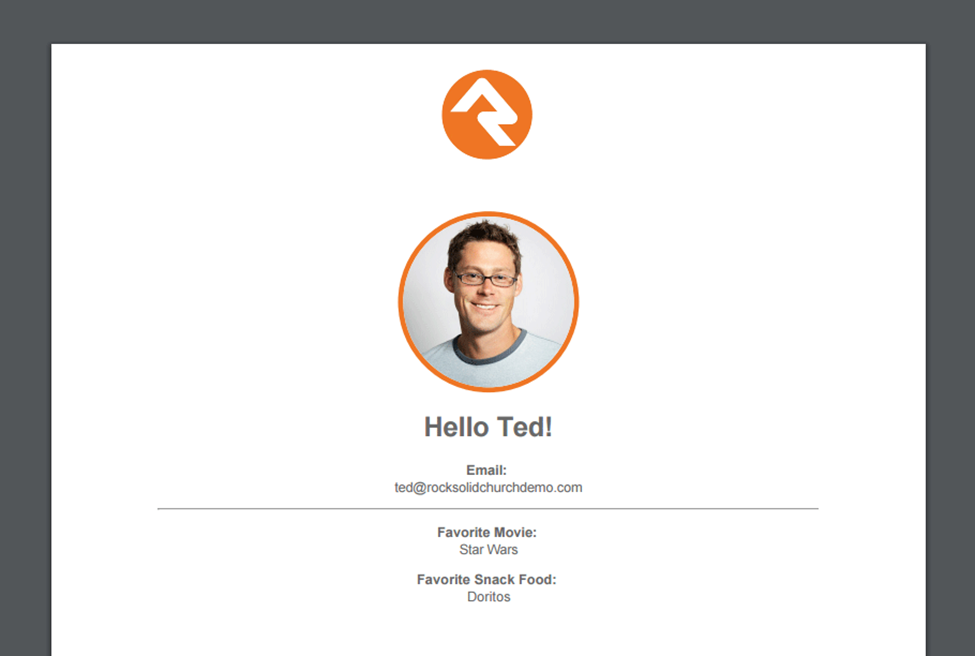
Below is a very simple example of a template and its
resulting PDF.
First the results (they’re so much better to look at :) )

And now without further ado, the template that was used to
create it.
- File Name: You have complete control of the filename that will be used for the PDF. This field even accepts Lava so you can personalize it.
- Result Attribute: This is the File attribute that the PDF will be saved to.
- Lava Template: Finally, the HTML template that is used to determine the content and formatting. We’ll look at some of the capabilities in detail next.
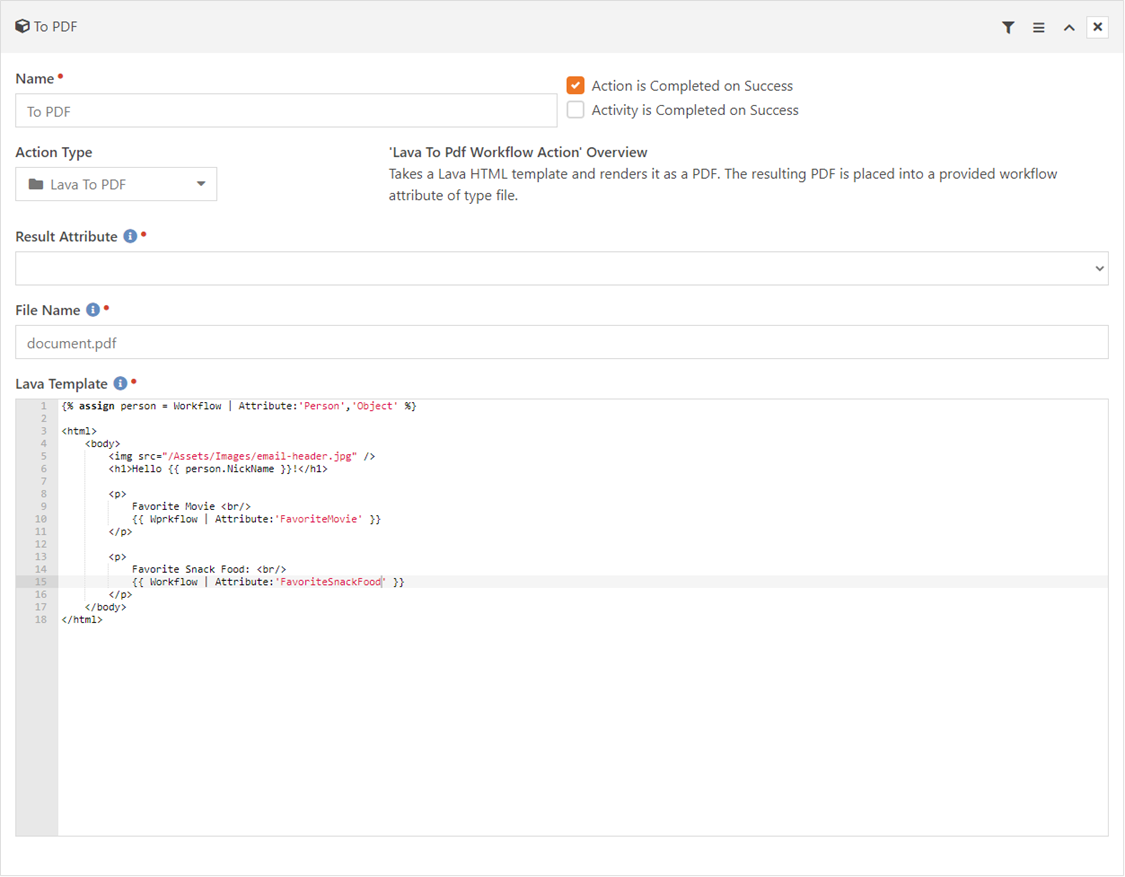
Ok, we’ve seen an example and wow… it’s cool! But… we can do
better… right? With the power of HTML and Lava, you can go crazy with your
design. Consider this template and its result.
And now the template that makes this piece of art.
- Before getting too far, we’re going to assign the workflow’s person attribute to a variable so we can reference properties and attributes from it later. Notice that we use the ‘Object’ parameter on the attribute load. This gives us the full person object (the default would give us the formatted value which is simply their name, booo.)
- Notice that you can embed custom fonts into your PDF. Before you reference them, though, in your CSS you’ll need to reference the font file. If you’re familiar with loading custom fonts in CSS, you’ll notice that we only need to register the otf or ttf file. A few lines lower in the CSS you’ll notice that we assign this new font to the body element.
- You can easily reference images in your template. Notice how the link to the image does not reference the server name. The base URL for the HTML/CSS the internal application root defined in the Global Attributes. You, of course, are welcome to fully qualify the link if you prefer.
- We next add another image to the document. This time we reference it from the person object (PhotoUrl). Also note that you can use all kinds of CSS to modify the image. We decided to make the image look round and added a border, just for fun!
- Finally, we show a few attributes from the workflow.
Recipes for Usage
So, we’ve seen the types of documents we can make, now let’s
consider some uses.
Once the document is stored in the workflow attribute, you
have several options on what you can do with it. Consider these examples:
- Person Attribute: Using the ‘Person Attribute Set’ action you can easily move the PDF from the workflow attribute to a person attribute.
- Group Member Attribute: Likewise, you can also use the ‘Group Member Attribute Set’ action to move the PDF to a group member attribute.
- Email File: When sending an email, you can include a link to the file using the Lava below inside of the ‘Send Email’ action.
<a href="{{ 'Global' | Attribute:'ExternalApplicationRoot' }}GetFile.ashx?guid={{ Workflow | Attribute:'File','RawValue' }}">Download Receipt</a>
(note you’ll need to update the attribute key (noted in green) for your specific value)
Caveats and Tips
Creating PDFs using this workflow action is incredibly
powerful. One thing to remember, though, is that these files are stored as
binary files in Rock. When configuring the attributes that hold them, you’ll
want to ensure that you pick a ‘File Type’ that stores it in an appropriate
place. Typically, this is not the database.
Database storage is expensive and large databases can be
difficult to backup. You might consider, instead, saving the files to the
server’s file system.
You’ll especially want to consider this while developing the
HTML/CSS for your file. Unless you’re a whiz (or have low styling standards)
you’ll probably need several tests to get your file looking just right. You’d
hate to store all those files in the database (yuck!)
Also, keep in mind the storage provider that’s used for the
file is the one set using the ‘File Type’ of the workflow attribute that the
PDF was originally stored to. If you move this workflow attribute to a person
or group member attribute the base binary file does not move, just the link to
it does. Be sure you pick the appropriate ‘File Type’ when configuring the
workflow attribute.
You can add headers and footers to your templates. Each
toolkit tool does this in a slightly different way, so be sure to read above on
how each implements the header/footer templates. The templates themselves are
standard.
Each template is a snippet of HTML (do not add <html>,
<head> or <body> tags). These snippets stand-alone from the primary
content template, so you’ll need to re-implement any styling you’d like. These
templates do support Lava so feel free to use it. They also support other
dynamic arguments to support features like page numbering. Let’s look at that
next.
Section Arguments
The following arguments can be added to your header and
footers to add dynamic capabilities like page numbers.
- [page] - Replaced by the number of the pages currently being printed
- [frompage] - Replaced by the number of the first page to be printed
- [topage] - Replaced by the number of the last page to be printed
- [webpage] - Replaced by the URL of the page being printed
- [section] - Replaced by the name of the current section
- [subsection] - Replaced by the name of the current subsection
- [date] - Replaced by the current date in system local format
- [isodate] - Replaced by the current date in ISO 8601 extended format
- [time] - Replaced by the current time in system local format
- [title] - Replaced by the title of the of the current page object
- [doctitle] - Replaced by the title of the output document
- [sitepage] - Replaced by the number of the page in the current site being converted
- [sitepages] - Replaced by the number of pages in the current site being converted
How header and footers work with the page margins and content
can be a little confusing at first. The figure below shows the basic layout.
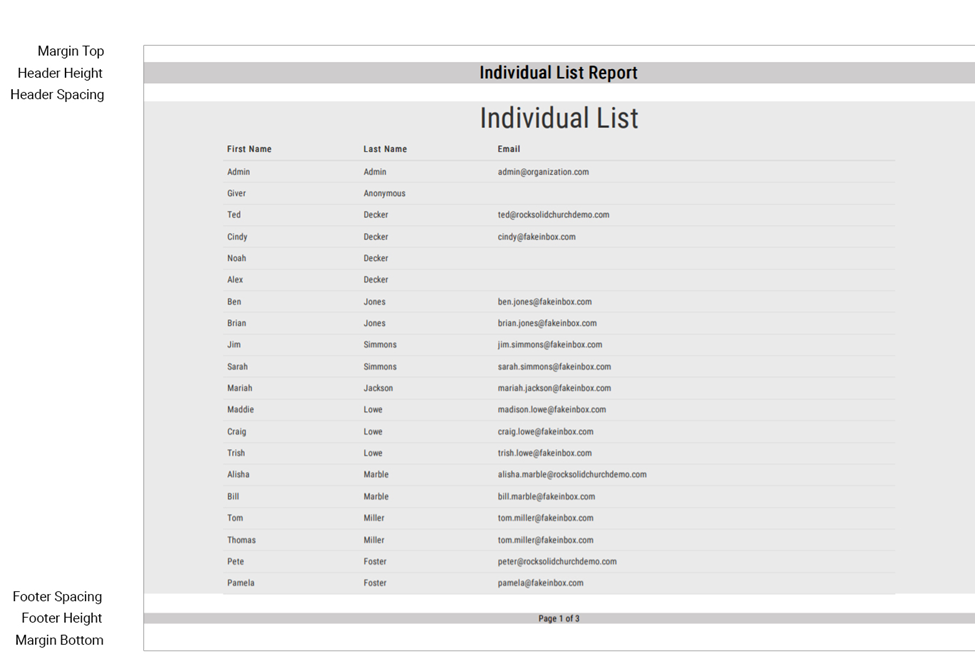
The header and footers spacing isn’t an exact science. For
instance, if you don’t provide enough room in your header height, the header
will start to steal space from your top margin. When it runs out of margin
space it will start getting trimmed off the page. Similarly, you’ll want to
adjust your header/footer spacing to ensure that there is no overlap with the
content. If your header or footer starts to overlap, simply add more spacing.
Updating from Version 1.0
When updating the library to version 2.0, we needed to
change PDF libraries. This was mainly done to support those running Rock on
Azure App Services. The new library is also much faster than the previous one
and uses less system resources. So, there’s something for everyone.
The biggest change comes around the way headers and footers
work. See the section ‘Headers & Footers’ for all the details.
Lava to PDF Block Settings That No Longer Exist
The new PDF library does not support all settings of the old
one. Below are some of the settings that didn’t make the cut. In most cases
there is a good work around to achieve the same result. In general, you won’t
be missing much and you’ll be gaining back more.
| Page Mode | This used to determine if the bookmarks or thumbnails should be displayed when the file was initially loaded. |
|---|
| Table Header Repeat | This feature is also not in the new library, but can be achieved through normal CSS print styling. Be sure to put your headings inside of a <thead> tag to ensure they are repeated on each page (this is proper way to markup headings on a table).Example:<table> <thead> <th> <td>Col Heading 1</td> <td>Col Heading 2</td> <td>Col Heading 3</td> </th> </thead></table>
|
| Avoid Image Page Breaks | This feature is also a part of normal CSS print stylesheets. img { page-break-inside: avoid; } |
| Document Background Color | This setting used to change the color of the PDF page. While you can still change the background color of the content, you can’t change the color of the entire page. In general, this isn’t a great idea from a graphic design perspective anyways. |
| Images Scaling Enabled | This used to auto scale the images for inclusion in your PDF in an attempt to save space. |
The new rendering engine is a bit different that the v1.0
version. For instance when using Bootstrap columns be sure to use the -xs-
breakpoint verses the common -md-.
Correct:
col-xs-6
Incorrect:
col-md-6
Now Get Out There Soldier
Enough talk, get out there and make ministry happen with
this new weapon in your arsenal!
But before you do… one more treat. Below is a simple Lava
template for a contribution statement. It’s more of a starting point actually,
but contains the basic information you’d want.
{% assign currentYear = 'Now' | Date:'yyyy' %}
{% assign selectedYear = currentYear %}


{% assign queryParms = 'Global' | Page:'QueryString'  %}
{% for item in queryParms %}
    {% assign kvItem = item | PropertyToKeyValue %}
    {% if kvItem.Key == 'Year' %}
        {% assign selectedYear = kvItem.Value %}
    {% endif %}
{% endfor %}

{% assign startDate = '1/1/' | Append:selectedYear %}
{% assign endDate = '12/31/' | Append:selectedYear %}

{% if currentYear == selectedYear %}
    {% assign endDate = 'Now' | Date:'M/d/yyyy' %}
{% endif %}


<html>
    <head>
        <style>
            body {
                font-family: Arial, Helvetica, sans-serif;
                font-size: 14px;
                padding: .5in;
            }
            table tr td,
            table tr th {
                page-break-inside: avoid;
            }
        </style>
        <!-- Note: You may need to edit this URL to match your environment -->
        <link rel="stylesheet" href="https://maxcdn.bootstrapcdn.com/bootstrap/3.3.7/css/bootstrap.min.css">
    </head>
    <body>

        <div class="row">
            <div class="col-md-6">
                <strong>{{ 'Global' | Attribute:'OrganizationName' }}</strong><br />
                {{ 'Global' | Attribute:'OrganizationAddress' }}<br />
                {{ 'Global' | Attribute:'OrganizationWebsite' }}
            </div>
            <div class="col-md-6 text-right">
                <h4>Charitable Contributions for the Year {{ selectedYear }}</h4>
                <p>{{ startDate }} - {{ endDate }}<p>
            </div>
        </div>

        <h4 style="margin-bottom: 24px;">
            {{ CurrentPerson.FirstName }} {{ CurrentPerson.LastName }}<br />
            {{ CurrentPerson | Address:'Mailing','[[Street1]]' }}<br />
            {% assign address2 = CurrentPerson | Address:'Mailing','[[Street2]]' %}
            {% if address2 != '' %}
                {{ address2 }} <br />
            {% endif %}
            {{ CurrentPerson | Address:'Mailing','[[City]], [[State]] [[PostalCode]]' }}
        </h4>

        <table class="table">
            <thead>
                <tr>
                    <th>Date</th>
                    <th>Giving Area</th>
                    <th>Check/Trans #</th>
                    <th style="text-align: right;">Amount</th>
                </tr>
            </thead>
            {% sql %}
                SELECT
                    t.[TransactionDateTime],
                    a.[PublicName],
                    t.[TransactionCode],
                    d.[Amount]
                FROM
                    [FinancialTransactionDetail] d
                    INNER JOIN [FinancialTransaction] t ON t.[Id] = d.[TransactionId]
                    INNER JOIN [PersonAlias] pa ON pa.[Id] = t.[AuthorizedPersonAliasId]
                    INNER JOIN [Person] p ON p.[Id] = pa.[PersonId]
                    INNER JOIN [FinancialAccount] a ON a.[Id] = d.[AccountId]
                WHERE
                    p.[GivingId] = '{{ CurrentPerson.GivingId }}'
                    AND DATEPART( yyyy, t.[TransactionDateTime]) = {{ selectedYear }}
            {% endsql %}


            {% for transactionDetail in results %}
                {{ transaction.Id }}
                <tr>
                    <td>{{ transactionDetail.TransactionDateTime | Date:'M/d/yyy' }}</td>
                    <td>{{ transactionDetail.PublicName }}</td>
                    <td>{{ transactionDetail.TransactionCode }}</td>
                    <td style="text-align: right;">{{ 'Global' | Attribute:'CurrencySymbol' }}{{ transactionDetail.Amount }}</td>
                </tr>
            {% endfor %}

        </table>
    </body>
</html>