Overview
Triumph’s Outlook plugin allows you to extend Rock’s reach
right into your inbox. This plugin allows you to view information about the
sender next to the email they’ve sent. Keep in mind that this plugin is for
Outlook. It’s not necessarily limited to Microsoft 365 or Exchange. Any Outlook
supported inbox should work.
Below are a couple of notes to be aware of:
- This add-in works on Windows, Mac and the Outlook.com website. It does not yet work in the mobile applications. This is being considered for a future version. Interest in this plugin will drive the pace of future development.
- Dark mode is not an option. This is a technical limitation in the Outlook integration. We’re interested in working around this, but more time will be needed. This too is a task that will be dependent on community interest (re: funding) of this plugin.
Warning
Licensing Policy
We prefer to spend our time working on ministry features vs licensing code.
Currently, there is no check for a current license. Use of this plugin is on
the honor system. If you stop your subscription, you must remove the add-in from your Outlook clients or update the Rock security to prevent it from working.
Configuring the Plugin
Before you deploy the plugin to your team, you’ll want to
configure that plugin in your Rock instance. You’ll find the add-in’s
configuration screen under “Admin Tools > Installed Plugins > Outlook
Add-in”.
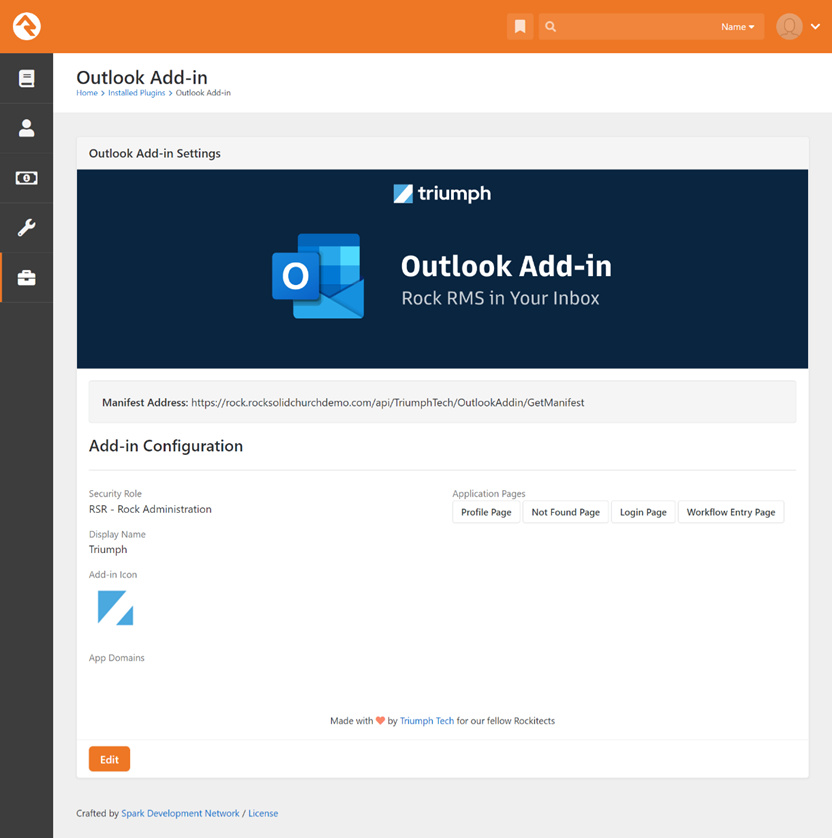
Below are notes on the various configuration options.
- Manifest Address: You’ll need this when you are deploying your add-in to your Outlook
clients. More details on how this is done can be found below.
- Security Role: This configuration allows you to limit who can access the plugin based on membership in a Rock security role. As you’ll see later, you’ll also be able to manage this in Microsoft 365, but we also wanted to provide an additional security setting within Rock.
- Add-in Icon: The next setting controls the icon that will be used for the add-in. This defaults to the Rock icon, but you can change it if you’d like. You’ll
want to ensure that you update this icon before you deploy your add-in as
Outlook caches this setting.
- App Domains: (This setting can be ignored unless you plan to customize the add-in yourself.) This setting determines which domains should be considered a part of your add-in. We auto add your internal application root domain. URLs for domains in this list will open inside of the add-in’s task pane window. Domains not on this list will open in a new browser window. When adding the domains be sure to follow these rules:
- Include the protocol (https://)
- Do not provide a trailing slash.
- Application Pages: We’ve provided links to the Rock pages that the add-in uses. This allows you to customize the pages to extend their capabilities. See the Customize the Add-in section below for more details.
Note
External Authentication Providers If you use an external authentication provider, you’ll want to add their domains to this list. For example, if you use Microsoft 365/Azure AD you’ll want to add “https://login.microsoftonline.com” to this list.
Warning
Page Security You’ll need to ensure that the security on the [Profile Page] and [Workflow Entry Page] are adjusted to work with the individuals using the application.
Site Configuration
In order for the Outlook Add-in to work on Outlook.com
(website) you’ll need to also complete the following steps:
- Edit the Internal Rock RMS site under “Admin Tools > CMS Configuration > Rock RMS”.
- Ensure that the Internal App Root is in the domain list.
- Update the “Allowed Frame Domain(s)” to include the Internal App Root, “outlook.office.com” and “outlook.office365.com”.
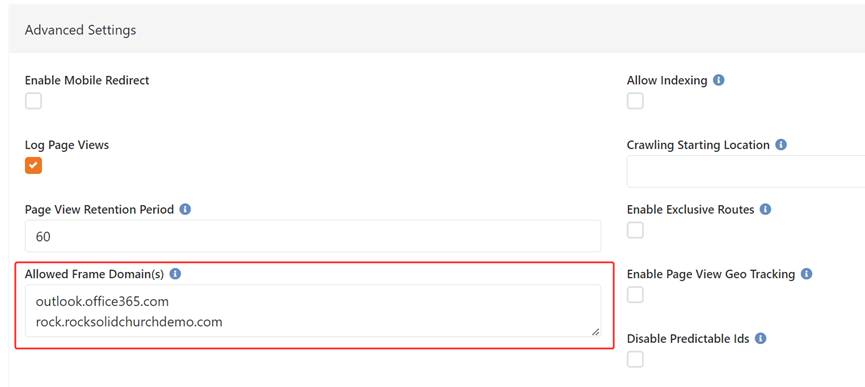
Additionally, the “Same Site Cookie Setting” global
attribute will need to be set to “None”.
Deploying the Plugin
You can deploy this plugin in one of two ways. Each is
discussed below.
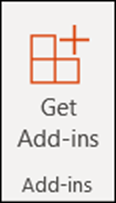
Single Person Installation
If you’re wanting to test the add-in out personally, or
you’re not a part of a Microsoft 365 organization you will need to install the
add in on an individual basis. To do this, open Outlook and follow the
instructions below:
- Click the “Get Add-ins” button in the Outlook ribbon.
2. This will bring up the Add-ins Configurations screen. Select “My add-ins” and then “Add a custom add-in”.
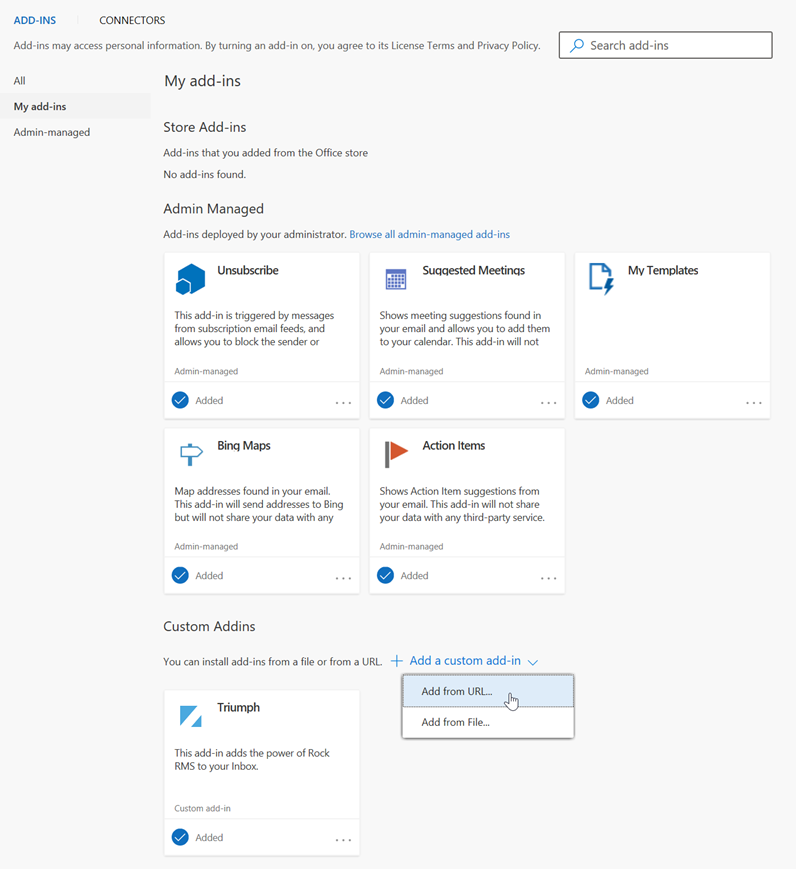
3. Select the “Add from URL” and then paste in the manifest URL from the plugin configuration page in Rock. After selecting “OK” your add-in will be configured, and you’re done.
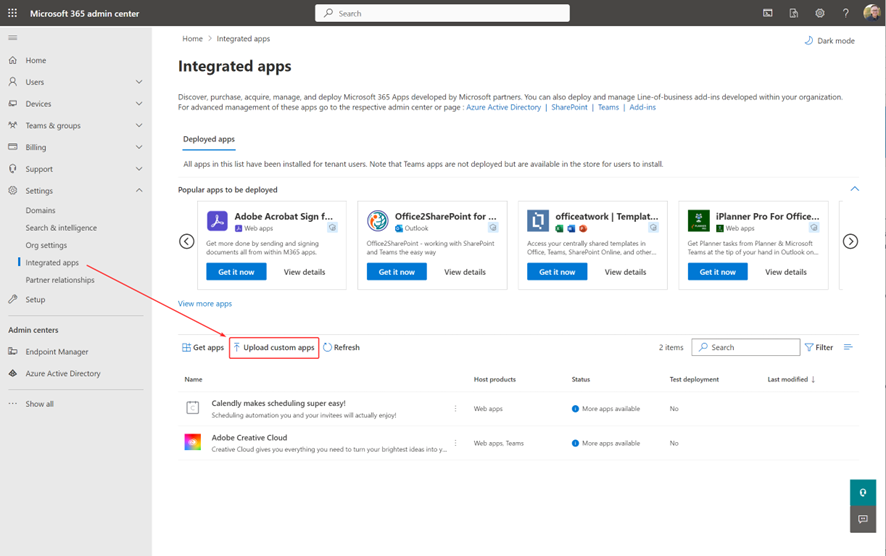
Microsoft 365 Administrative Deployment
If you are running in a Microsoft 365 environment, deploying
the add-in is a breeze. Simply follow the steps below to deploy the Outlook
Add-in to your teams.
- Open the Microsoft 365 Admin portal at https://admin.microsoft.com
- Head to “Settings > Integrated apps”.
- Click the “Upload custom apps” link
4. Select “Provide link to manifest file” and paste in the URL to your manifest, then click “Validate” and finally “Next”. This link is available in the plugin configuration within Rock.
5. You’ll then be able to select who you’d like to deploy the add-in to.
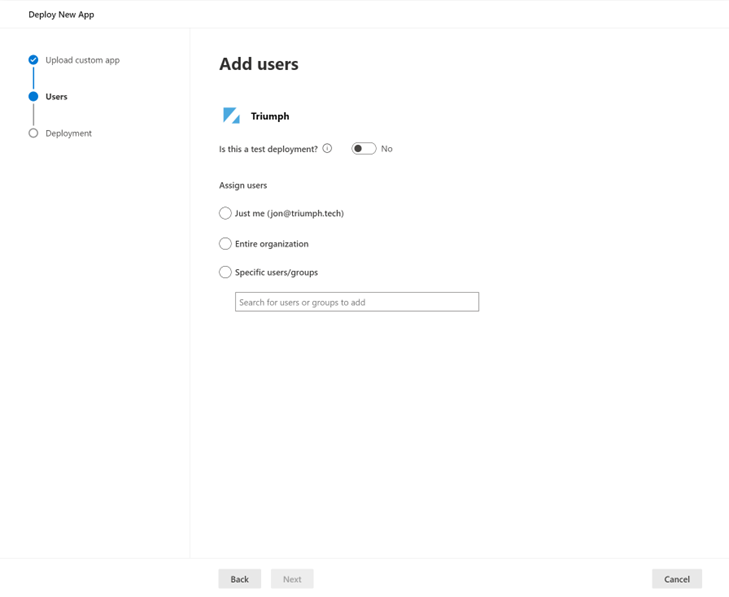
6. Finally,
the add-in will be deployed to the individuals you’ve selected.
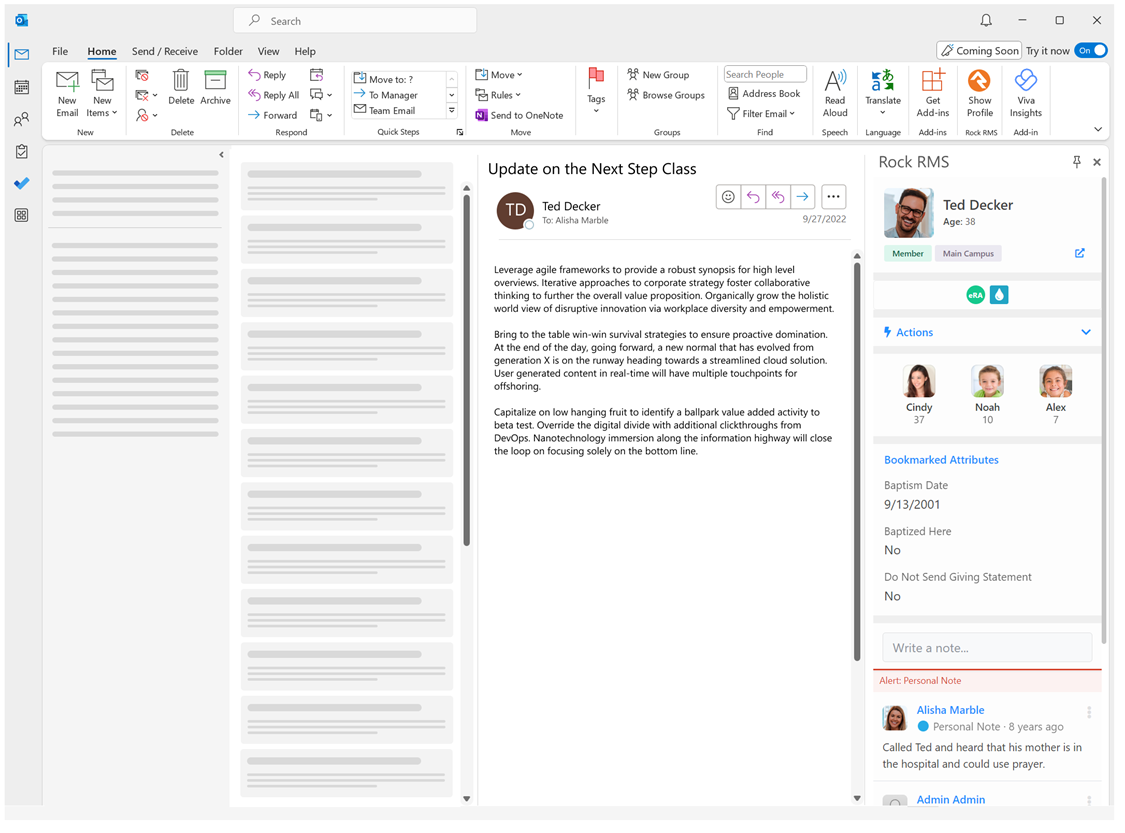
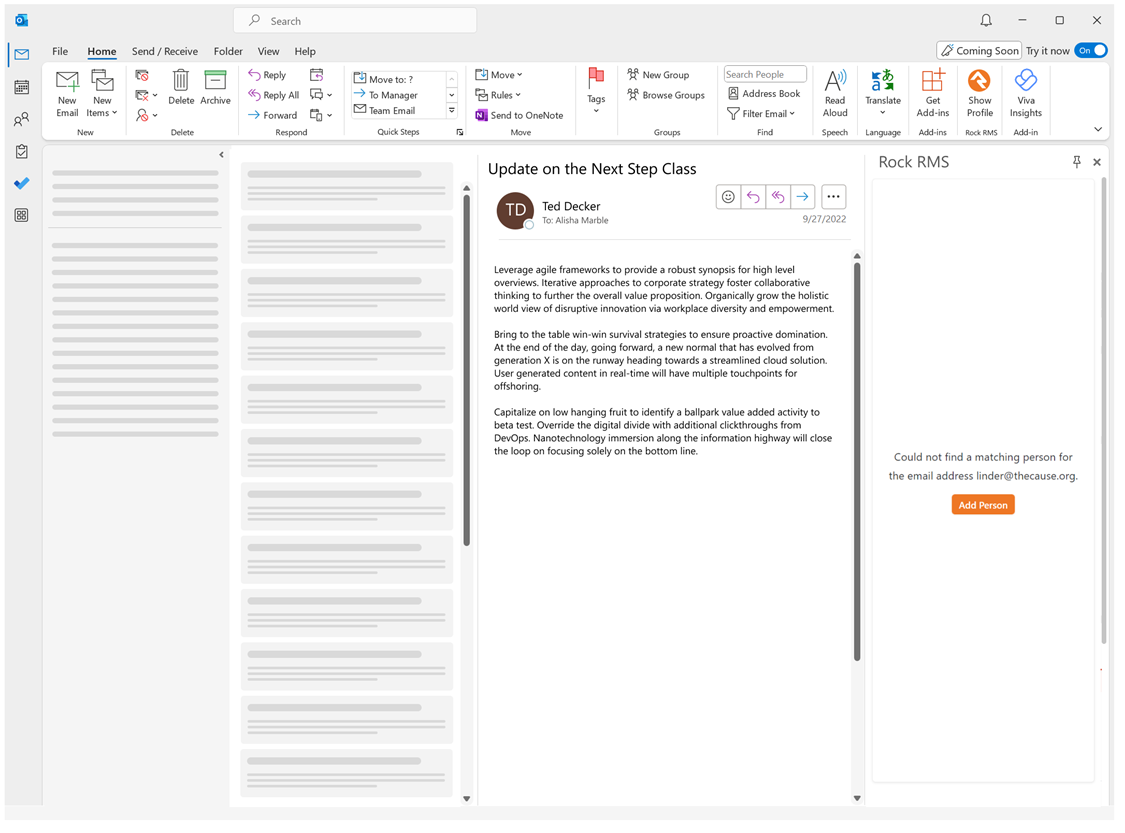
Using the Add-in
Once you’ve deployed your add-in, you’ll see a new button in
the Outlook ribbon with the add-in icon with the label “Show Profile”. This
button will only be enabled when an email is selected, and a message is shown
in the reading pane. This will open a task pane that will show the Rock
record that matches the address the email was sent to.
By default, the task pane will close when you switch emails.
If you’d like for it to remain open simply pin the task pane by clicking the
ping icon in the top right.
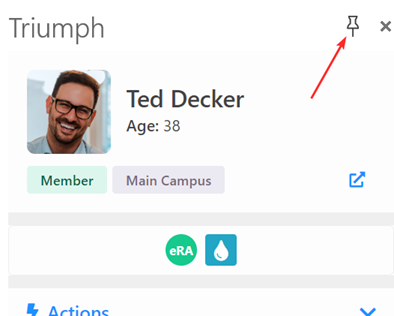
Below is an example of a profile for a sender whose address
is in Rock.
Let’s take a look at each section of the Rock integration to
see what’s possible.
Bio Section

This section shows basic information about the individual.
- Phone number allows you to quickly convert the email to a more personal phone call.
- The arrow icon will display the full Rock profile in a new window.
Badges

This section shows a limited set of badges. You can customize this to show badges you’ve already developed. When customizing this block it’s important to note that we only show badges in the lower bar of the block.
Actions
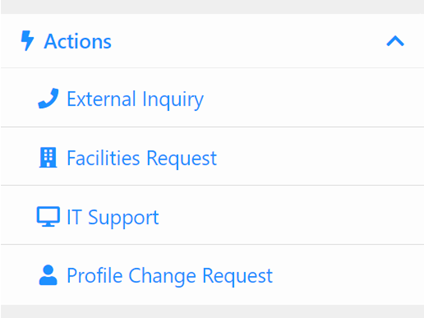
The Actions section allows you to launch workflows right from Outlook. These workflows will execute right in the task pane even allowing you to complete forms right inside of Outlook. Which workflow types that are displayed here are based on a block setting and respect security.
Primary Family
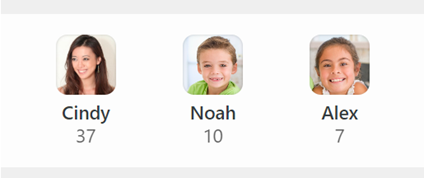
This section shows the individuals in the person’s primary family.
Bookmarked Attributes

The bookmarked attributes section allows the display of a small subset of attributes. The attributes listed are customizable for each individual using the add-in. The configured attributes are also specific to the Outlook add-in which allows an individual to customize them for their task needs within Outlook.
Notes
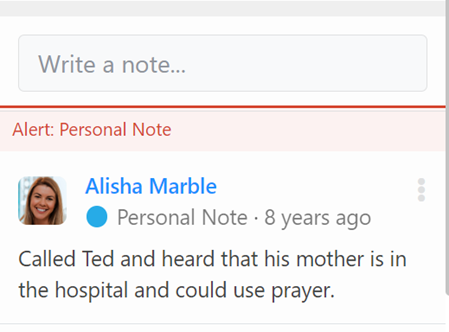
The final section is for notes. This will display notes for the sender. It also allows you to add new notes right from Outlook.
If there is no matching record in Rock for the senders email a button will be displayed that allows you to add a new record to Rock.
Customizing the Add-in
We’ve worked hard to deliver an experience that provides a
lot of power for your team. However, like everything in Rock, you can customize
it to take it to the next level.
The pages that display in the Outlook Add-in are simply Rock
pages that are styled for to match the Outlook environment. You can add to
these pages to suit your needs.
Important Tips
- We recommend that you keep your customizations to block settings until we reach version 2.0 of the plugin as we’ll be adding new capabilities. These changes will likely require us to update the Lava in the existing blocks which would over-write your customizations.
- If you absolutely do need to change the Lava we recommend that you clone the profile page we ship with and move the route. This will allow us to update our shipped page without over-writing your customizations. You can then see what we changed and make the same changes to your custom pages. Again, if at all possible, please refrain from changing the Lava templates for now.
Technical Notes
Below are some technical notes on using the plugin. You
should not need these details unless you do advanced configuration changes.
Outlook.com
When using Outlook web edition there are a few notes you’ll
want to be aware of.
- Safari: On Safari you’ll need to disable the prevention of cross-site tracking to complete the login process. See the link below for instructions: https://support.apple.com/guide/safari/prevent-cross-site-tracking-sfri40732/mac
Caching
Outlook Add-ins rely heavily on cache for speed. This is a good thing but can be frustrating when developing. Below are a few tips to help you get around caching issues. If you’re finding that the changes you made while developing are not being served, try these steps to flush the cache:
- Windows - Delete the contents of the following folder on the client machine. %LOCALAPPDATA%\Microsoft\Office\16.0\Wef\
- Mac - Follow the instructions found on this webpage: https://learn.microsoft.com/en-us/office/dev/add-ins/testing/clear-cache#clear-the-cache-manually