Overview
The Entra Sync plugin enables Rock administrators
to synchronize data between Rock and Entra and enables single
sign on (SSO) allowing your Entra users to log into Rock with their Entra credentials. Data may be synchronized in
either direction (from Rock to Entra, or from Entra into Rock), and may
be synchronized on demand or with a schedule job.
By default, the Entra Sync plugin will synchronize the
members of a group, and will attempt to match existing records in either system
using the logic of:
- Entra -> Rock – The sync will look for an exact match of ‘First Name’, ‘Last Name’ and ‘Email’.
- Rock -> Entra – The sync will look for an exact match of the Rock ‘Email’ to the Entra User Principal Name (think email in Entra).
Warning
IMPORTANT NOTE: The plugin can only sync users from Rock to Entra if they have an email address with a domain that exists in Entra under “Custom domain names”. When syncing from Rock to Entra, Rock is unable to modify group membership for mail-enabled groups in Entra (this includes mail-enabled security groups and distribution lists). Mail-enabled groups can only be managed from Exchange/Office 365 Admin Center.
Additionally, you may configure an automated job to sync changes in one direction (from Rock to Entra) for the following fields:
- Office Phone
- Home Phone
- Job Title
- Department
- Company
Data may also be synchronized for User Photos in either direction.
Note
User pictures in Entra can only be retrieved or modified if the user has an Exchange mailbox
(usually part of an Office 365 subscription).
This is a limitation of the Microsoft Graph API.
Pre-Installation Setup: Configuring Entra
To configure the plugin, you will need to register the application and grant necessary permissions in your Entra tenant.
Step 1: Create a new App registration in your Entra tenant.
Begin by opening your Microsoft Entra ID blade (and ensure you have selected the correct tenant) in the Azure Portal and then selecting the “App registrations” option from the resource menu on the left. Create the new registration by clicking on the “New registration” button on the top of the App registration blade.

Configuration Option Explanations:
- Name - You can choose any name here you want, but we recommend going with something like “Rock Entra Sync Plugin” to make this app registration’s purpose obvious.
- Supported Account Types - Leave the default selection (single tenant) selected for this option.
- Redirect URI - If you will be using the SSO functionality of the plugin (to allow you to log in to Rock with your Entra credentials) you will need to enter a value here. This is the page (on your Rock server) that you will use to log in to Rock with your Entra credentials. It can be any URL that you want, but we recommend that you use something like https://my.church/sso or https://my.church/entralogin. We will discuss setting this page up in Rock in a later section. If you will not be using the SSO functionality, you may leave this setting blank.
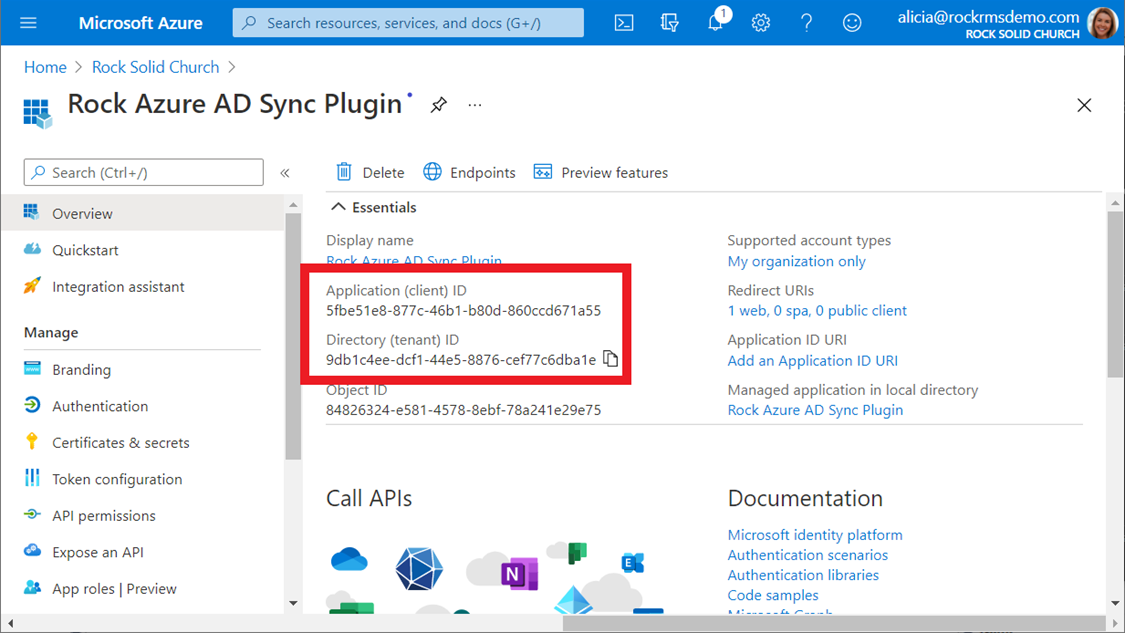
Step 2: Make a note of your
configuration settings.
After you create your new App registration, you will be
taken to the management blade for the new resource you created. This page has some important information that
you will need to configure the plugin later, so go ahead and make a note of the
“Application (client) ID” value and the “Directory (tenant) ID” value. If you entered a Redirect URI value in Step
1, make a note of that as well.
You will also need to click the “Endpoints” at the top of the blade and make a note of the first two endpoints:
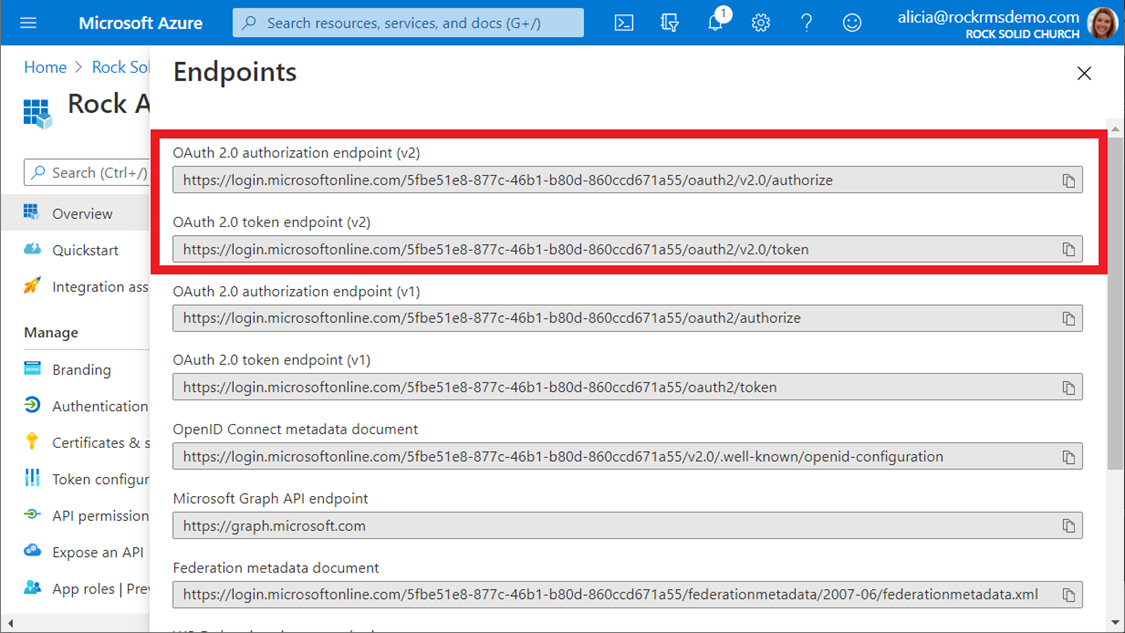
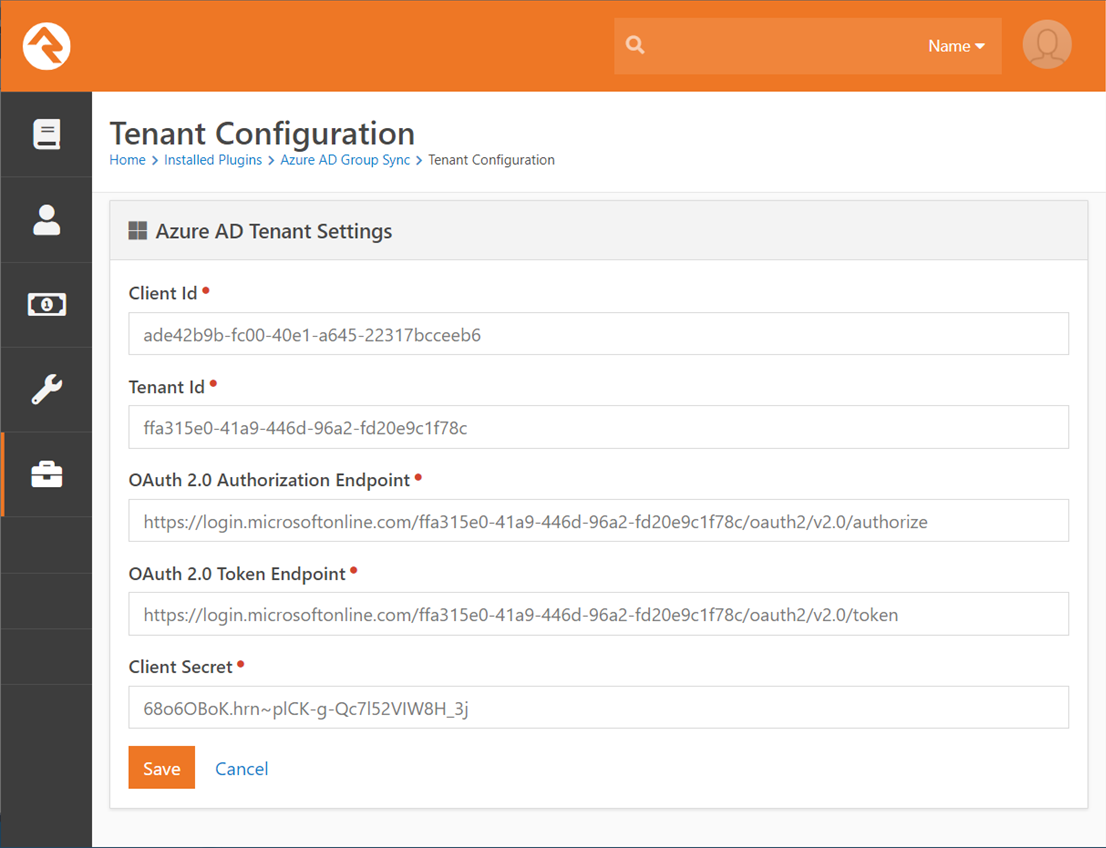
You should now have the following information collected:
- Entra Tenant Id
- Entra Client Id
- OAuth 2.0 authorization endpoint (v2)
- OAuth 2.0 token endpoint (v2)
- Redirect URI (if you are using the SSO feature of the plugin)
Step 3: Grant your App registration
permissions to read and write users and groups.
The Entra plugin needs permission to read and modify user
and group records in your Entra tenant and to read basic data from your
directory. It does this with the
Microsoft Graph API, and it will need the following permissions:
- Directory.Read.All
- Group.ReadWrite.All
- User.ReadWrite.All
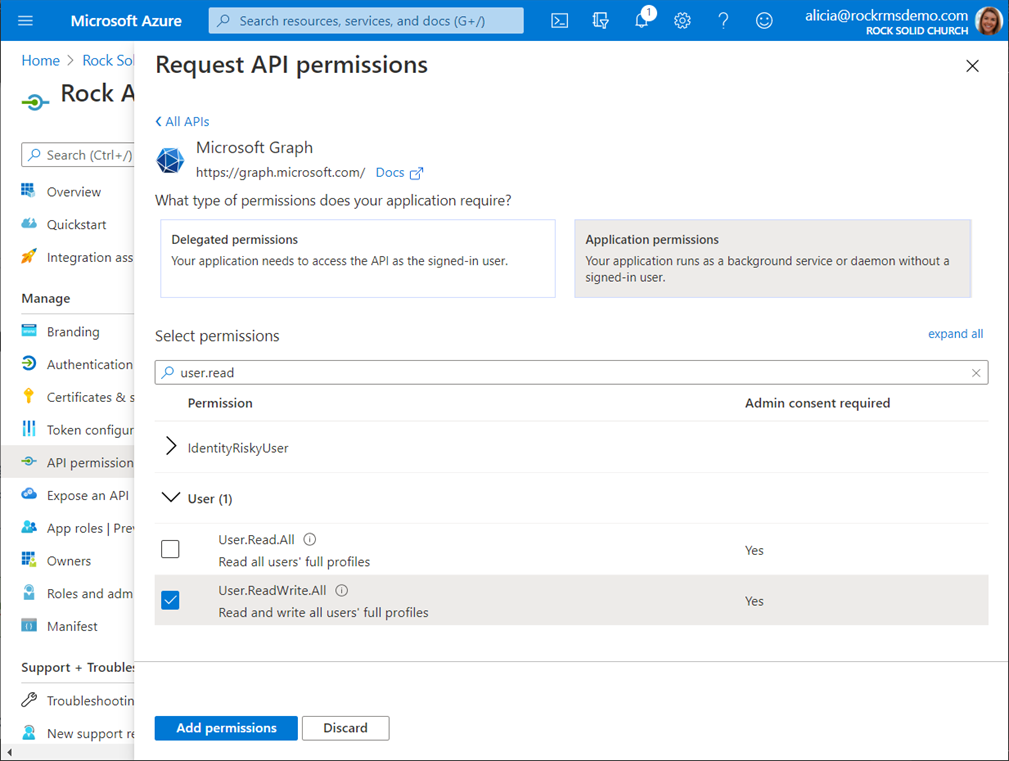
To add a new permission to your application, select the “API
permissions” option from the resource management menu on the left, and then
click on the button to “Add a permission”.
Select the “Microsoft Graph” option and then choose “Application
permissions” and add the desired permission.
You can add all three at once.
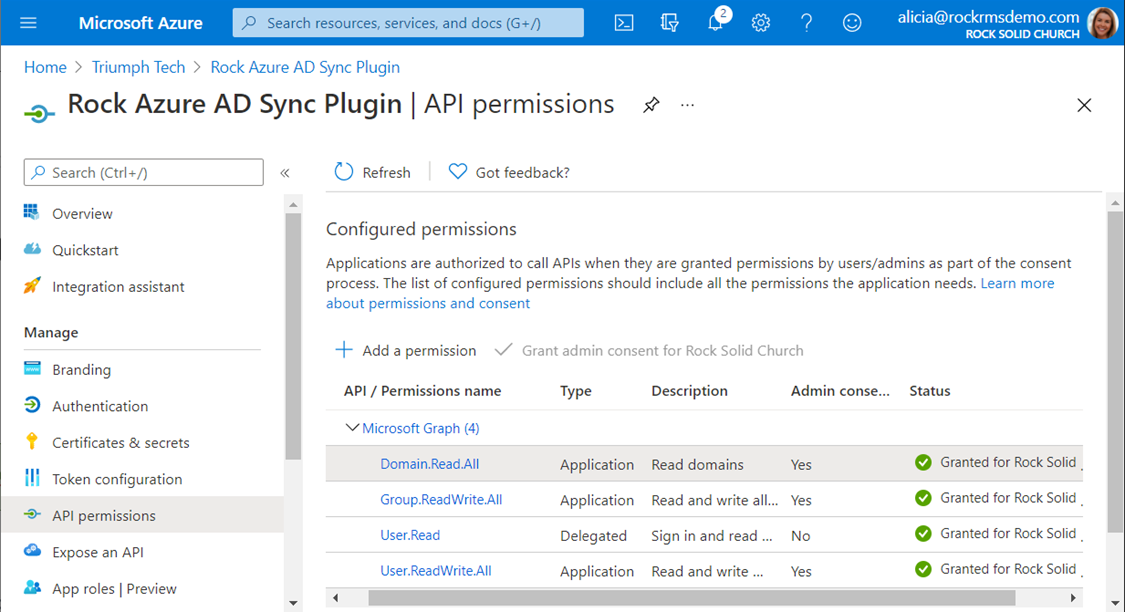
Step 4: Grant Admin consent.
To finalize the permissions you added, you will need to
grant admin consent. After you are
finished with this step, your API permissions screen should look like the
screenshot below.
Tip
TIP: You must have administrative privileges in Entra tenant to grant admin consent.
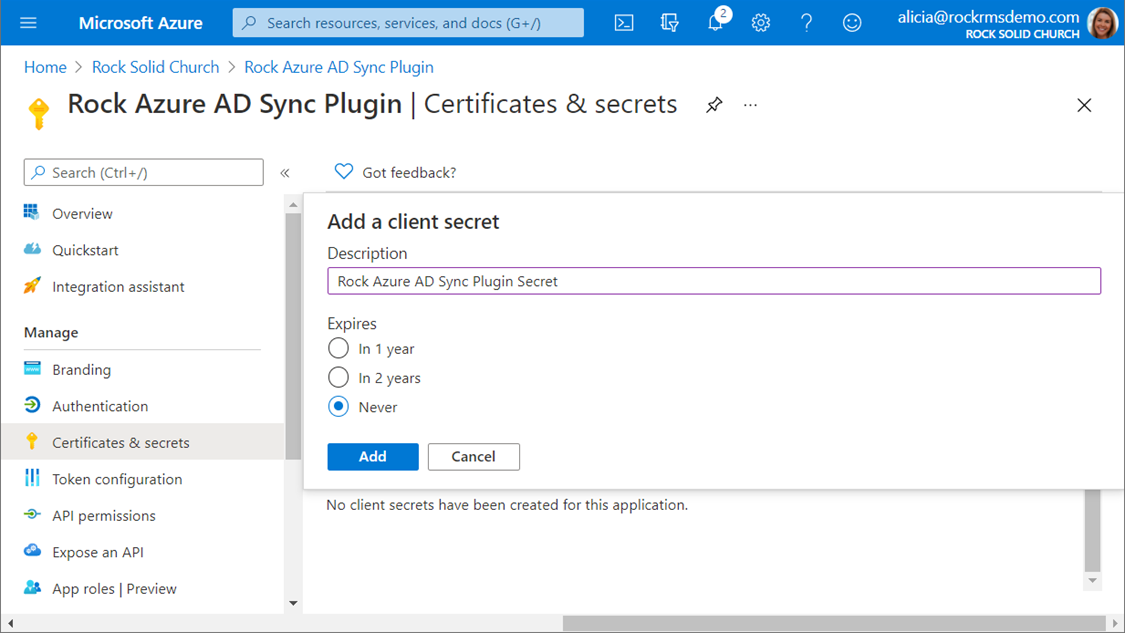
Step 5: Create a client secret.
The plugin uses a client secret to authenticate itself to Entra. This secret is like a password, and anyone with the secret has the permissions you have granted to the application registration resource in the previous steps, so you should treat this value as highly sensitive exactly like you would a password.
To create a new client secret, select the “Certificates & secrets” option from the resource management blade (you should still be viewing the app registration you created). Scroll down to the “Client secrets” section and click the button to add a new client secret. You can name the secret anything you like, but as with the app registration, we recommend that you use a name that makes the purpose of the secret obvious. We recommend you choose the “Never” expiration option. Choosing a different expiration timeline means you will have to create a new secret and enter it into your plugin configuration when the old secret expires.
After creating your
secret, you can copy the value. You will
need to record the value at this point, as you will not be able to retrieve it
again later. If you need this value
later and you did not capture it at this point, you will need to create a new
secret and use that, instead.
Tip
Make sure you note the value of the client
secret before proceeding past this screen.

Now that your Entra tenant is configured
and ready to go, it is time to configure the plugin. If you have not already installed the plugin,
you will want to do that from the Rock Shop, now. You will also need the configuration
information you recorded in Step 2 of the Pre-Installation Setup and the client
secret you created in Step 5.
Navigate to Admin Tools >
Installed Plugins and select the Entra Group Sync option. Then click on the Entra Credentials button on
the top right and enter the configuration values from the previous steps.
The plugin synchronizes members of groups in Rock or Entra, so you will need to create groups in both systems. To configure the synchronization settings,
navigate to Admin Tools > Installed Plugins > Entra Group Sync and
click on the button to add a new entry.
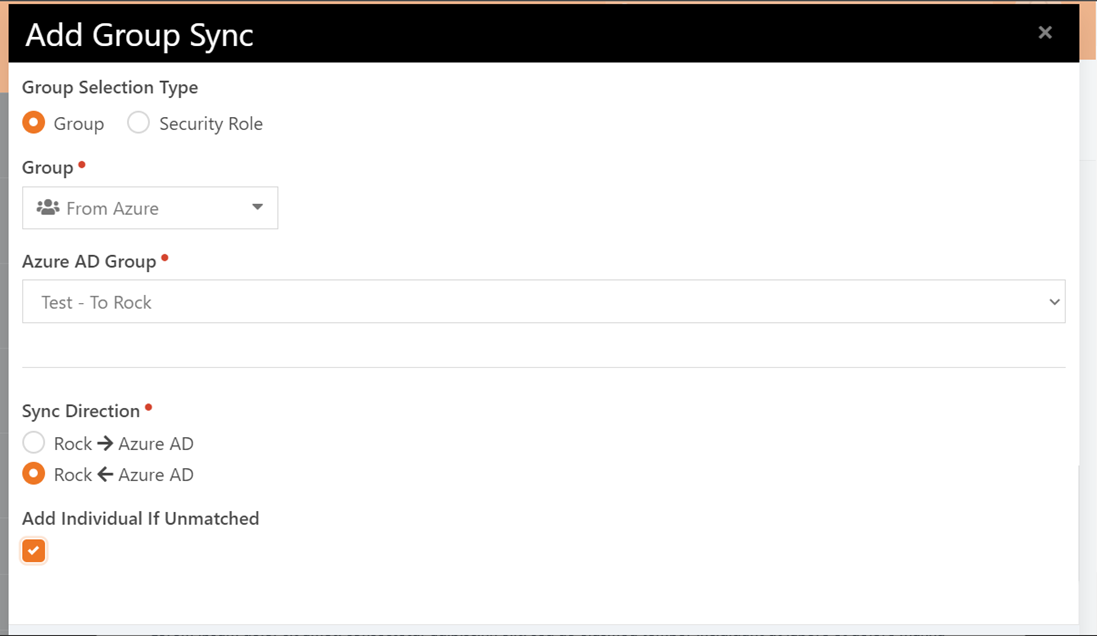
You will be given the following configuration options:
- Group Selection Type – This determines whether you will be selecting a Rock Security Role, or a normal group.
- Group – The Rock group or security role.
- Entra Group – The Entra security role or group. These groups must be created in the Entra portal first.
- Sync Direction - This controls whether Rock or Entra is the destination system.
- Add Individual If Unmatched – This will add the individual to Rock or Entra if no matching record are found. Note: Adding the person in Entra will not create licenses or add mailboxes.
Tip
If you want new users to be added to the destination system, make sure to check “Add Individual If Unmatched”.
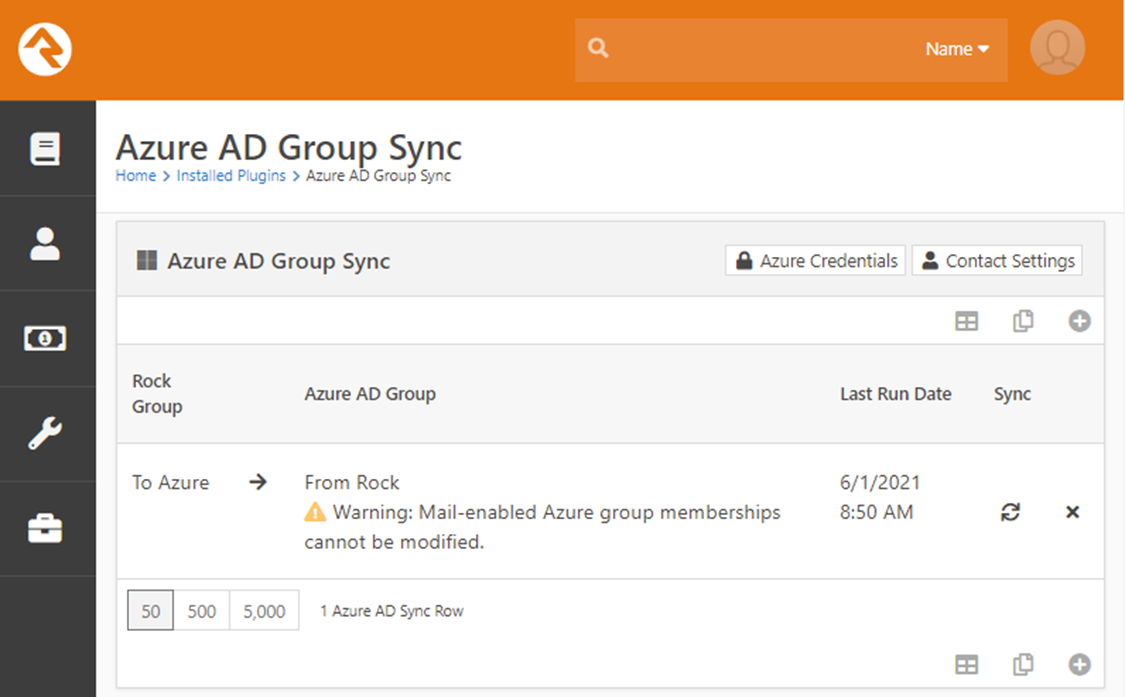
A Note About Entra Mail-Enabled Groups
If you configure the settings above by selecting a
mail-enabled group in Entra (a distribution group or
mail-enabled security group) and setting the sync direction to push data from
Rock to Entra, you will receive a warning notification informing you that the
plugin is unable to modify group membership for mail-enabled groups in Entra. This means that the
plugin cannot add or remove any members from this group. These groups will still support contact
synchronization between the user records in Rock and Entra, but the only way to
change the group membership of mail-enabled groups is from your Exchange/Office
365 Admin Center.
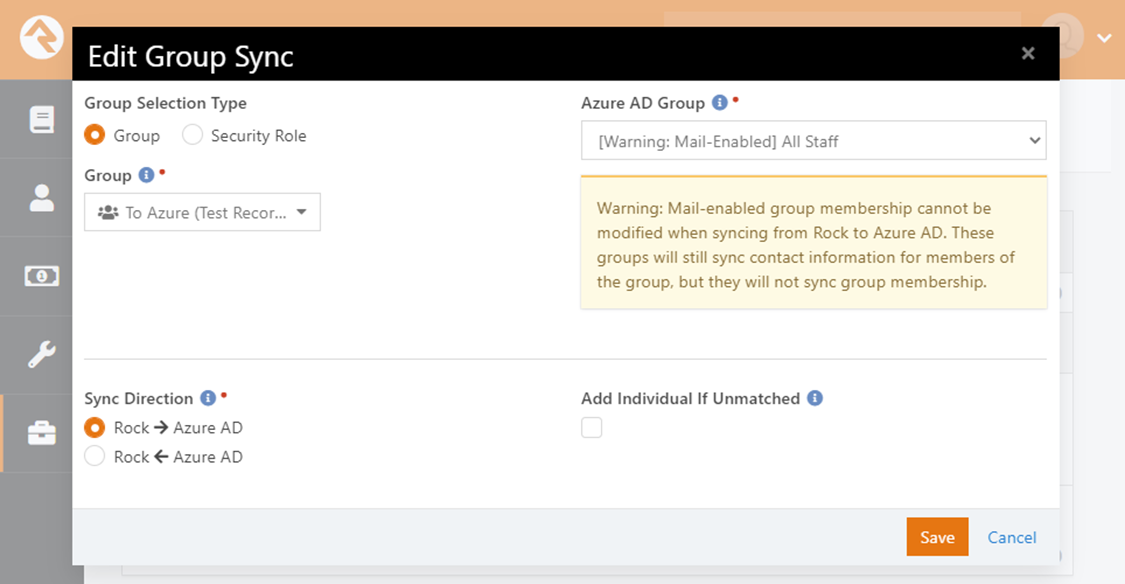
If you configure a group in this way, you will also receive
a warning about the group configuration in your group sync list.
If the group members of your Rock group and the Entra mail-enabled group are not synchronized when the plugin tries to
execute the synchronization process, you will receive warnings in the job
report and in Rock’s exception list. The
exception list will identify which users could not be added or removed from the
group (by their Entra user GUID). You
can avoid these warnings by making sure that any mail-enabled groups you
configure to sync from Rock are manually synchronized (in other words, put the
same people into both groups).
Manually Sync a Group
After configuring your groups for synchronization, you can
sync them manually by pressing the “sync” button next to the group.
The plugin includes an automated job which can be scheduled
to synchronize your groups. To enable
this, navigate to Admin Tools > System Settings > Jobs Administration and
add a new job. On the Scheduled Job
Detail screen, select “Sync Entra (Plugin)” as the Job Type.
The plugin can be configured to synchronize contact
information from Rock to Entra whenever it synchronizes a group (this will
occur whether the group is synchronized manually or by the automated job, and
these settings will affect all synchronized groups, as long as the sync
direction is going from Rock to Entra).
Note
The options in this section affect all your synchronized groups that push data from Rock into Entra.
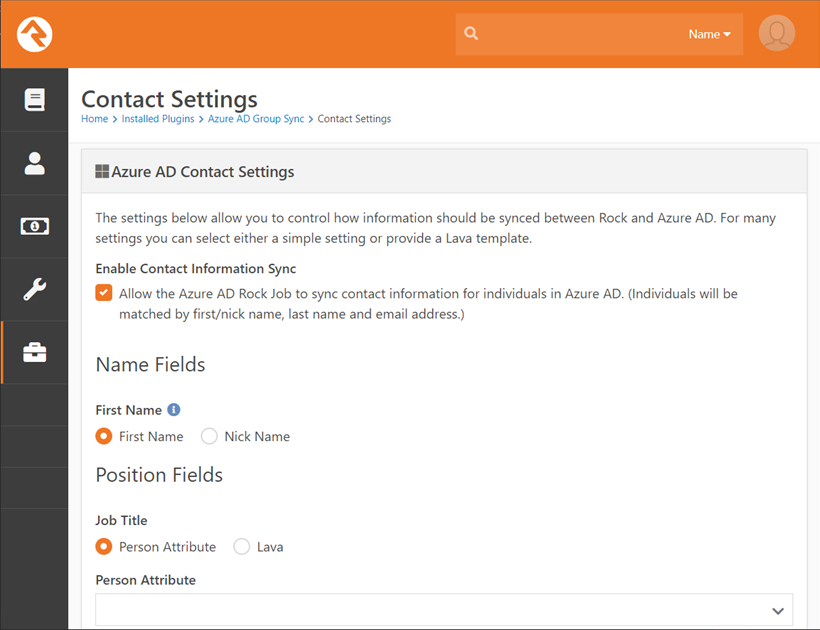
To enable this feature and configure the settings, navigate
to Admin Tools > Installed Plugins > Entra Group Sync and click the
“Contact Settings” button in the top right corner.
Note
You cannot configure any of the options on this screen until you enable them by checking the “Enable Contact Information Sync” option.
Configuration Options:
- Enable Contact Information Sync - This option must be selected to enable synchronization of contact information.
- First Name - The first name field in Entra will be matched to either the first name or the nickname field in Rock. This setting controls which one.
- Job Title - This setting is only effective when data is being sent from Rock to Entra. It will have no effect when the synchronization happens in the other direction. You can select either a Person Attribute value or a Lava expression to control the value that is sent to Entra.
- Department - This setting is only effective when data is being sent from Rock to Entra. It will have no effect when the synchronization happens in the other direction. You can select either a Person Attribute value or a Lava expression to control the value that is sent to Entra.
- Office - This setting is only effective when data is being sent from Rock to Entra. It will have no effect when the synchronization happens in the other direction. You can select either a Person Attribute value or a Lava expression to control the value that is sent to Entra.
- Company - This setting is only effective when data is being sent from Rock to Entra. It will have no effect when the synchronization happens in the other direction. You can select either a Person Attribute value or a Lava expression to control the value that is sent to Entra.
- Office Phone Type - This setting controls which Rock phone type is used to synchronize to the office/business phone in Entra.
- Mobile Phone Type - This setting controls which Rock phone type is used to synchronize to the mobile phone in Entra.
Note
The Position Fields (Job Title, Department, Office, and Company) can only be configured to synchronize data from Rock to Entra. They do not have any effect when data is being synchronized from Entra to Rock.
Warning
The Microsoft Graph API does not allow you to modify the phone numbers or of a user who has administrative privileges in your Entra tenant. This is an intentional limitation for security reasons (those phone numbers can be used for account recovery). If you enable the synchronization for those fields and this condition occurs, those fields will not be modified in Entra (but the rest of the person’s information will sync correctly).
Tip
We recommend avoiding situations where the same individual record is synchronized in both directions.
It is possible to configure groups in a manner that results in an individual being synchronized in both directions by having them in multiple group sync configurations. In other words, the same user might be in a group that you have configured to push data from Rock into Entra and another group that you have configured to pull data from Entra into Rock. We recommend that you avoid this situation, but there may be situations where you configure the sync this way intentionally. In that case, if you have configured the contact information sync, the data in Rock will become the “master record” because contact information is only synchronized in that direction. This will mean that changes you might make directly in Entra will be overwritten and you should make any changes to the individual’s contact information in Rock.
There is one exception to this rule, which is that the Microsoft Graph API does not permit updating an administrator’s phone numbers (office phone and home phone) in Entra. This limitation is because those values are used in the Entra account recovery process and allowing external changes to them could block administrators from being able to recover their account and result in locking them out and may present a security risk if the external application is compromised.
Configuring the single sign on feature of the plugin will
allow users to log in to Rock with their Entra
credentials. To enable this feature, you
must configure an app redirect in your Entra App registration. For details on doing that, review Step 1 of
the Pre-Installation Setup at the beginning of this document. It is okay if you did not enter the URL when
you first set up the plugin, you can add it when you are ready by editing the
configuration of your App registration.
To enable and configure the Entra authentication provider (in Rock) that is
installed by the plugin, navigate to Admin Tools > Security >
Authentication Services and select the “Entra” provider.
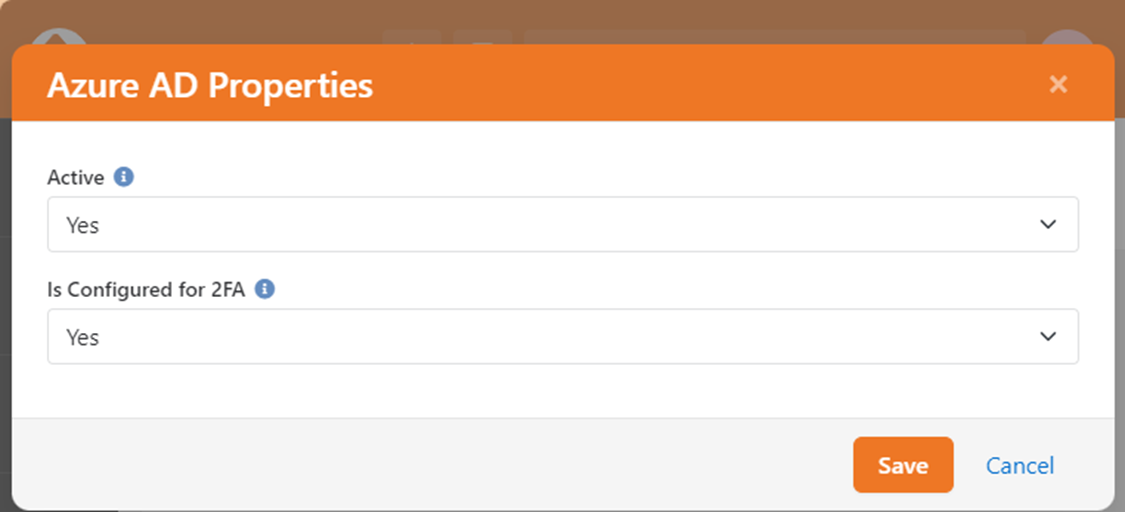
Configuration Options:
- Active – This option should be set to “Yes” to enable Entra authentication.
- Is Configured for 2FA – This option should be set to “Yes” if two-factor authentication (2FA) is enabled in Rock and Entra is configured to handle multifactor authentication outside of Rock. If set to “No” and Rock requires two-factor authentication, individuals will not be able to use Entra for authentication.
Setting Up the SSO Redirect Page
The second thing you need to do is create a new page in Rock
(Admin Tools > CMS Configuration > Pages), and you will probably want to
make a Route for it, as well (Admin Tools > CMS Configuration > Routes)
so that you can refer to it by a friendly URL (like http://my.church/sso)
instead of the default page URL. For the
purposes of this document, we will assume you know how to do this part, but you
can always review the Rock documentation if you need a refresher. Specifically, we recommend starting with the CMS
Configuration section of the Rock Admin Hero Guide for a brief overview, or
you can dive into the full details in Designing
and Building Websites Using Rock.
Once you have created your Page and the Route, you will need
to add the Custom Login block to the page, which you will find in the Triumph
Tech > Entra category.
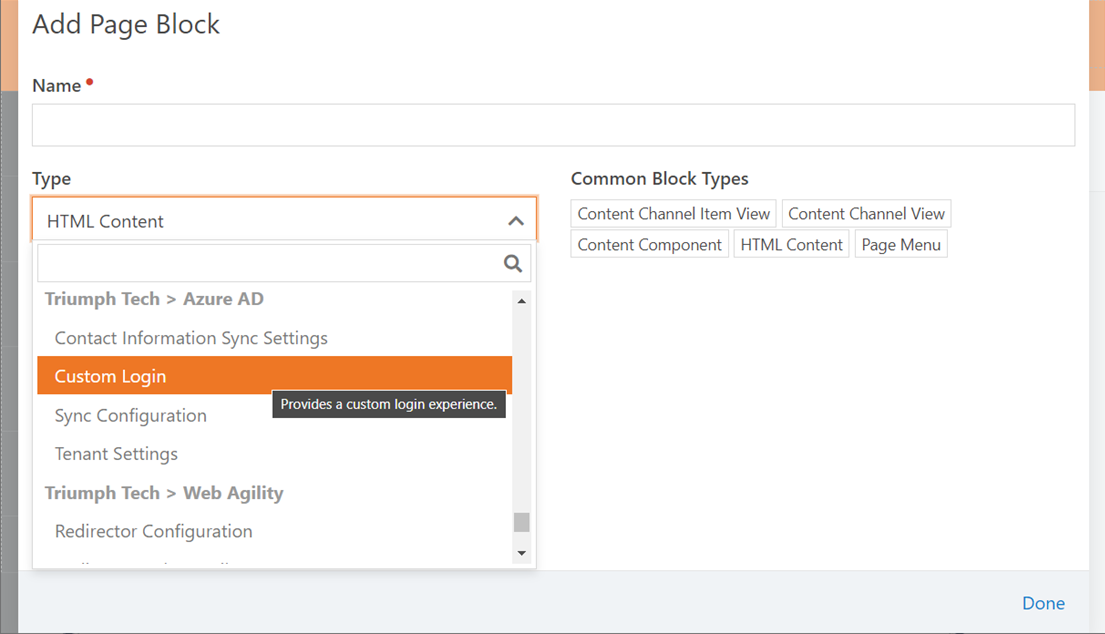
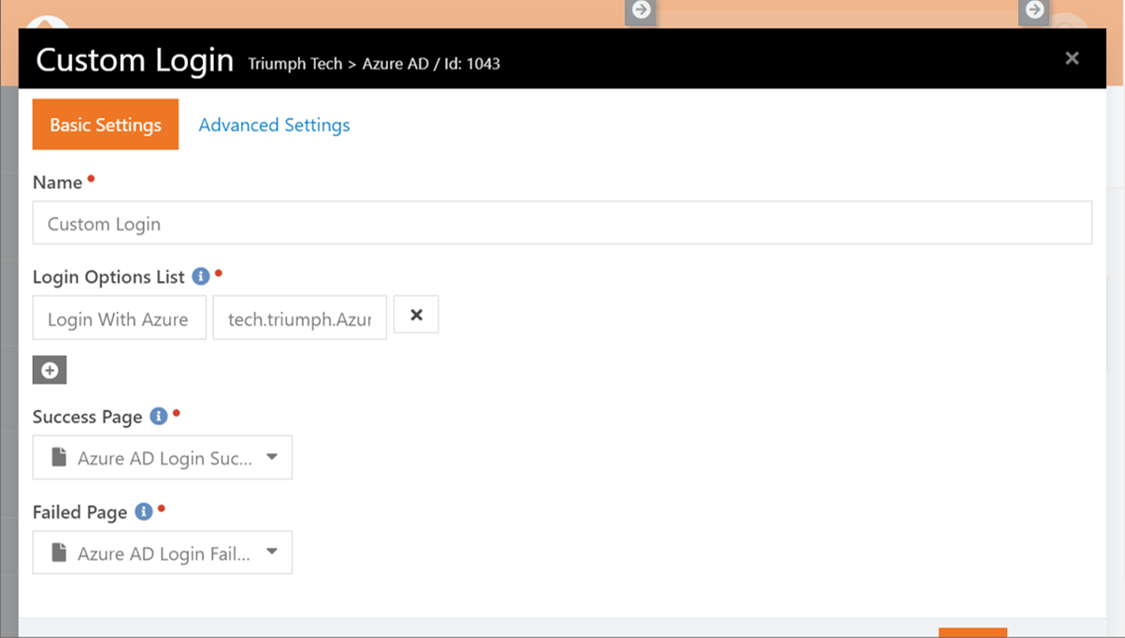
After you add the block to your
page, you need to configure the following settings on the block:
- Login Options List
- This option allows you to set up multiple login options by specifying the button text (on the left) and either entering a URL or the type name of an authentication provider (on the right). To enable users to log in through Entra, you will need to enter the full type name of the Entra authentication provider, which is “tech.triumph.AzureAD.Security.Authentication.AzureAD”.
- Success Page
- This is where users are redirected after a successful login if there is no return parameter specified in the URL. If there is a return parameter, the user will be redirected to that page (like the standard login).
- Failed Page
- This is where users are redirected after a failed login.
Note
This block has been designed to work with other login methods, but we are only using Entra, here.
Release Notes
- v1.8
- Fixed an issue where the individual is always redirected to the success page after a successful login, even when a return parameter is specified in the URL.
- Fixed an issue where the return URL is double-encoded upon redirect after successful login.
- v1.7
- Improved matching functionality for Entra users who already exist in Rock.
- v1.6
- Updated "Azure AD" to "Entra" to match Microsoft's name change.
- v1.5
- Applied a more dependable fix for the issue where the plugin's configuration page would time out.
- v1.4
- Fixed an issue where the plugin's configuration page would fail to load, eventually timing out.
- v1.3
- Added support for two-factor authentication.